Main Number Handling – PSTN number as a Response Group IVR Destination

In my last post, I covered how to have a Response Group Queue overflow/timeout action send a call to a PSTN number. That means you can send a call to an analog phone (maybe a cordless one), a mobile, or any other PSTN number. That’s awesome for overflow and timeouts, but there’s still a hole in Response Group functionality: how can an IVR option deliver a call to a PSTN destination?

Every once in a while, you need to get creative in your solutions to meet end-user requirements. The solution here is tricky to figure out, but simple to configure once you know what to do.

To review, a Response Group IVR is when someone calls a workflow number, hears options, and presses a corresponding key. The native workflow options are to deliver the call to a Queue, or to ask another series of questions. There is no option to deliver a call to a PSTN number.

If we look deeper at the Queue configuration, the only place to specify a PSTN number is in the overflow and timeout options. If we could set the workflow to deliver a call to a Queue, and set the Queue to overflow immediately to a telephone number, we’d be set. We can do that by setting the Maximum number of calls in the Queue configuration to zero:

Queueoverflow0

And if you try the call, it will not work. As it turns out, a Queue will error out if there is no Group assigned to the Queue. The fix is simple: create a user in AD, enable them for SfB and enable Enterprise Voice, create a new Response Group group and assign the new user as an Agent. Assign that Group to the Queue:

Group in Queue

And things will work – a call to the IVR, where the caller selects the option for the mobile number, will be forwarded to that mobile phone immediately. The Queue process throws an error when it see there isn’t a Group with at least one Agent assigned, it never gets far enough in the process to look at the overflow options.

I don’t recommend that you use a real user’s SfB account for this. Create a fake account, and make sure you add comments or notes to indicate the purpose of the account, so that it’s not deleted or changed.

If you’re going to use this solution for a number of different workflows, you can use a more generic name for the User and Group, and use the same User and Group for all the Queues, as the destination is configured in the Queue.


Main Number Handling – Putting it all Together, Response Group Calls to a non-SfB number

A few years ago, I worked with a two different organizations who had the same scenario.  They had a main number for the security department. This number was for a Response Group Workflow, which would ring the security staff and a couple of additional phones in the security area, such as the break room.

That worked well when there was someone in the security office to answer the call, but it meant that calls would go to voicemail if there were no security staff in office. This happened often, especially in the one organization that was closed at night and the security staff member had to do patrols.

The solution for both was to setup the Response Group Queue timeout and overflow actions to “forward to telephone number”:

call action PSTN

Note the formation for the telephone number – you need to enter it as if it’s a SIP address, with your SIP domain after the @.

Yes, all of my lab environment domain names are colors! I set the desktop background of all the servers to be the domain name color, which helps me stay straight on which environment I’m connected to.

Okay, that’s cool, we can forward calls to a mobile or analog or any other phone as a timeout action on a queue. Tune in next blog post, where I show you how to send a call to any PSTN destination from a Response Group IVR.

Main Number Handling – Putting it all Together in Larger Offices

I previously covered some simple solutions for main number handling for smaller offices. Now let’s have a look at larger offices.

I’ve worked with several organizations that prefer a human voice answer the phone wherever possible, and when that can’t happen they would allow the call to handled by an Auto Attendant.

The simplest way to configure this is to have the main number be a response group workflow. The receptionist is added as an agent. In the Queue, set the timeout (and optionally the max calls) overflow destination to the SIP address of your Auto Attendant. Callers now ring the agents when they first call, and then get the Auto Attendant if no agent can take their call.

Up next, some scenarios where you might want to add a second group of agents.

Main Number Handling – Cloud PBX Call Queues

I’ve covered Response Groups in a number of earlier posts. Microsoft has started implementing similar functionality in Skype for Business Online, called Call Queues.

Where Response Groups are quite comprehensive and have “lite” call center functionality, Call Queues aren’t there yet. There are a number of key differences between the two. First up, let’s have an general overview of Call Queues, then we’ll compare them with Response Groups.

General

The purpose of Call Queues is to provide automated call distribution to a group of users, called agents. You can have up to 50 agents assigned to a Call Queue. Agents are assigned to a Call Queue using distribution lists, or mail enabled security groups. The Call Queue can handle 200 simultaneous calls. If you’re handling 200 simultaneous calls, you should evaluate contact center software to see if it offers you additional functionality that you can take advantage of.

As with Cloud PBX Auto Attendants, you can upload a corporate greeting. If you don’t have a favorite application for this, try Audacity. You can also specify a music on hold file, that’ll be played while callers are in the queue waiting for an agent.

When you setup group, you need to allow time for the group to sync from Azure Active Directory to Azure Address Book Service.

Calls are distributed to all of the agents in the groups you configured, to a maximum of 50, or there is a global setting to reduce this count further. If you’re using groups with larger membership, be aware that not everyone will be offered every call. If you want more certainty in who is offered a call, create custom groups.

Overflow

Each Call Queue has an overflow threshold, after which new calls will have some configurable action taken on them rather than the call being added to the queue. This can be 0 to 200, but has a default of 50.  You can select actions of DisconnectwithBusy, Forward, or Voicemail.

There is also a timeout option, so that after a certain amount of time in the Queue, calls are send to another Call Queue, Auto Attendant, Voicemail, or User. You can also just disconnect the caller.

Consider whether you want to use the disconnect options. While the caller will hear a busy tone, you may want to forward the call to voicemail, and play an informational message. I would never recommend a disconnect for the Queue timeout – why would you disconnect someone after they’ve been waiting in the queue for 10 minutes (or however long you configure).

You’ll need a Cloud PBX Service Number to assign to your Call Queue, and you can use both tolled and toll-free. You can use a new service number for setup and testing, and port in your existing number.

The timing of the port may prove awkward if this is your main number. You can setup your Call Queue with a new number, and have your existing main number forwarded to it. When you receive notification that the number has ported, you can edit your Call Queue to use the new number directly.

Your Tenant needs to have E5, or E3 plus Cloud PBX licensing, in order to have Cloud PBX Call Queue available.

If you want your Cloud PBX Call Queue to direct calls to a voicemail box, you should setup a phantom user (a user account with no real human attached to it), and have that mailbox be the target of Queue.

Call Queues allows Online SfB users with a Cloud PBX license to be agents, regardless of what region they’re in. A PSTN Number or PSTN Calling user licenses isn’t required. Agents must be using the SfB 2016 or Lync 2013 desktop clients, or a Cloud PBX-certified IP phone. No Mac or mobile clients are supported according to documentation from March 2017, however I have seen the iOS client in action as a Call Queue agent.

You cannot use SfB on-prem users, Cloud PBX users with have PSTN connectivity through an on-prem connection, either through CCE or a full on-prem pool. You also can’t use on-prem only services like response groups, and you can’t distribute a call to an external PSTN number.

Comparison with Response Groups

Call Queues have some of the functionality of Response Groups, however at this point Response Groups have far more flexibility and functionality.

Call Queues lack IVR capability. If you need this, you can front a Call Queue with a Cloud PBX Auto Attendant. Have the Auto Attendant deliver calls to the Call Queue.

Response Groups have a richer management story. It’s possible to delegate management of a Response Group to a user (like a help desk manager) and relieve IT of the management burden. This isn’t possible with Call Queues.

Response Groups have the concept of Formal and Informal mode. Formal mode requires the user to logon to the Response Group to receive calls. Informal mode is where the user is always “logged on”. Call Queues offer only Informal mode.

For overflow scenarios, Response Groups allow you to act upon the oldest call in the queue or the new call. Call Queues only allow you to act upon the new call.

When it comes to distributing calls to agents, Response Groups offer 5 call routing methods: Attendant, Parallel, Serial, Round Robin, and Longest Idle. At this point, Call Queues offer only Attendant routing.

And lastly, when you’re building a list of agents, Call Queues use only distribution lists or email enabled security groups. Response Groups can use DLs, but also allow you to manually build a list of agents.

Outside of these major differences, the two services are very similar. I would expect that additional Call Queue functionality will be released often. Be sure to check the Office 365 Roadmap to see if a feature you’re interested in is on the way.

You can provide feedback on what features you feel are important with Skype for Business. The Skype Operations Framework academy page has online training for you to learn more.

Main Number Handling – Auto Attendant vs Response Group

I’ve covered Exchange Unified Messaging Auto-Attendants and Skype for Business Response Groups in some depth in previous posts, and I wanted to do a comparison between the two. The two share some overall similarities, with some major difference that will lead you to select one over the other, and minor differences that you’ll want to be aware of.

Microsoft recently released two Skype for Business Online features: Cloud PBX Call Queues and Cloud PBX Auto Attendant. These two SfBO features are roughly analogous to Exchange Auto Attendant and SfB on-premises Response Groups, however to be clear I am not referring to the Cloud PBX functions in this post unless I explicitly mention them.

Main Feature Comparison

In the following table, I state whether functionality is available in Response Group and Auto Attendant scenarios, and in some cases I provide some more clarity and detail beyond a “yes” or “no”.

Feature

Response Group

Auto Attendant

Anonymous call out

Yes, user can call as the Response Group

No

Management delegation

Yes, per Response Group (and associated Queues and Groups)

Not very granular, only to “Exchange UM” RBAC role within Exchange.

User lookup/dial by name (speak or spell)

No

Yes

Schedule

Scheduled to the minute. Two open periods per day, otherwise closed.

Scheduled in 15 minute blocks, any number of blocks may be open or closed.

After-hours and holiday support

Yes

Yes

Calls delivered to

Natively to PC SfB client. Voicemail and other timeout/overflow options available.

To any SfB client, or any phone number reachable by Exchange – including PBX extensions and PSTN numbers.

Honors Team-ring, Delegation, SimRing, Call pickup, mobile clients

No, only rings the user’s PC or desk phone.

Yes

IVR

Yes, multiple choices and levels. Calls delivered to Queue, not directly to an endpoint.

9 choices, one level. Calls delivered to a number, mailbox, and can play a message

Caller can dial 0 to reach operator at anytime

No

Yes

Call queuing

Yes – call is delivered to a queue

No – call is transferred to the number specified

Multiple language support

Yes

Yes

Voice recognition

Yes

Yes

Text-to-speech or recorded greetings

Yes

Yes

Can read location and business hours to caller

No

Yes

Formal agent logon mode (user logs into and out of a queue)

Yes

No

Online or on-prem server based?

On-prem servers only.

(Use Cloud PBX Call Queues for online deployments)

Both. Exchange UM Auto-Attendants have the same functionality on-prem and online.

Can deliver calls to on-prem user

Yes

Yes

Can deliver calls to online user

No, users must be homed on-prem.

Yes

Can assign multiple phone numbers to reach it

No

Yes

Can record greetings via telephone

No

Yes

The details in this table refer to native functionality of the Auto Attendant or Response Group solution. For example, you can only natively assign one Line URI to a Response Group workflow. If you wanted to have multiple numbers to reach a workflow, there are a number of ways outside of Response Group functionality that would permit you to do that.

Final Considerations

An additional consideration that you’ll need to make is the topology of the Exchange and SfB environments. If a call comes in from the PSTN via an SBA in a branch office and has to traverse the WAN to a central office to Exchange and SfB servers, the two solutions are equal. If you are using Exchange Online, calls to your Auto Attendant now have to traverse the Internet to the cloud.

In the not so distant past, I worked with a client in a “PSTN into the SBA” scenario, where calls had to traverse the WAN to reach Response Groups, and the WAN and an underspec’d VPN to a privately hosted Exchange system. That VPN was spec’d for email (and the specs weren’t even generous for that) not voice, so voice, Auto Attendant, and Subscriber Access suffered accordingly.

And finally, make sure you’re supporting REFER, and that your firewalls allow appropriate media flow between all of your clients and servers involved in these scenarios. Appropriate levels of bandwidth and QoS are also a must.

Up next: Cloud PBX Auto Attendants and Call Queues, the Cloud PBX cousins of Exchange Auto Attendants and SfB on-prem Response Groups.

Main Number Handling: Response Groups, pt 6 – Interactive Response Groups

We’ve setup and explored almost all of the functionality that Response Groups have to offer. The remaining part is Interactive Response Groups. You may know these as IVR, or Interactive Voice Response, or call trees.

Interactive Response Groups allows you to play a message, and have the caller press a key or say a response, in order to direct them to the most appropriate Queue.

Configuration Differences vs Hunt Groups

In comparison to Hunt Groups only Step 7 in the configuration process differs. In Step 7 for Hunt Groups, you simple select a Queue to send the call to. For Interactive Response Groups you need to specify, at a minimum:

  • A welcome message, either icky text-to-speech or a recording
  • Two options for your callers to choose from, along with Queues to deliver them to

With the response details collapsed, Step 7 looks like this

Step 7 collapsed


Note that Responses 3 and 4 are optional, use the checkbox to enable them.

The configuration options within each Response are the same. First, you specify what response from your caller corresponds to this Response option:

Response 1

You can configure keypresses of 0-9, *, #, or nothing. You can also provide voice-recognized words for your callers to use. Note that a blank keypress means your callers must use a voice response. Given that crummy cell phone calls can interfere with speech recognition, you should always include a keypress option. For voice recognition options, you can include multiple responses separated by a comma. For example:

Response 1 multianswer

If you want to offer more level of questions, you can choose to ask another question instead of sending a call to a queue

 Full Response Expand

Here again, you must provide at least two options, and you have an option to provide up to four.

With the four “level one” options, and then 4 more “level 2” options, you can ask you callers a maximum of two questions, and direct them to 16 different Queues based on their response. In my experience, that’s more than sufficient to prevent annoying your callers, but to also get them to the right agent. If you need more options, you can use PowerShell to configure more, Anthony Caragol provides a great overview of that process. That doesn’t look like fun, and if you build a mess and hand it off to a co-worker, I’m pretty confident you won’t be getting any Christmas cards from them. Worse would be if you build a mess, and then have to come back and change it yourself in several months.

You might also consider Call Flow Manager which provides a much better interface and allows for more options.

However, be aware that if you configure a Response Group that has more options than your GUI of choice, you must resort to Powershell. Planning your IVR carefully means happier callers, and happier you. If you find yourself being forced into PowerShell to manage your IVR Response Groups, I’d say that’s a pretty strong indicator that you should have a look at contact center software.

When you’re configuring multiple layers, note that you don’t have to have two layers for every option. For example, if your first level question is “Sales or Support”, you can send calls for the sales team off to the Sales Queue, and then ask  a 2nd level question for those who chose Support.

There is a lot of flexibility in the Interactive portion of Response Groups versus a standard Hunt Group. Plan carefully to keep yourself happy when you to support what you’ve built!


Main Number Handling – Response Groups Pt 4 – Workflow Details

In the last post, we covered the essentials that you need to get a Workflow (and your Response Group) up and running. In this post, we’ll cover the full seven steps to configure a Response Group.

Before we begin, a caution:

The Response Group Configuration Tool can hiccup every once in a while, especially if you are creating a number of Response Groups at the same time. I recommend that you  configure the bare minimum of SIP Address, Display Name, and Queue, then hit save.  Come back and edit the Workflow after that.

If you need to step away from the tool mid-build, or have configured some particularly cool and detailed settings, hit save often.

And lastly, you must have already defined the Queue that you will assign to handle calls. Saving after you configure the SIP Address, Display Name, and Queue will save you from getting to the end of the page, and doing a facepalm because you can’t save your Workflow config without a Queue to assign.


Step 1: Activate and Name the Workflow

Let’s break this one down into three areas.

The core of the Workflow

CoreActivateName

We covered SIP Address and Display name in the previous post. Telephone number is straightforward. Note the formatting here, they’ve included the tel: for you, unlike for user LineURIs. Display number should be the Telephone number, but formatted to however local users are used to seeing the number. Description is any text that you wish, and note that this text is published on the Contact Card for the Workflow object.

Workflow objects aren’t much different from user objects in Skype for Business from a contact list perspective. They are searchable, clickable, have contact cards, and you can add them to your contact list and favorite them.

Workflow Management

CoreWorkflowManagement


You have a managed or unmanaged Workflow. Setting a workflow to managed allows you to delegate the administration of the entire Response Group – Workflow, Queue, and Group – to one of more Skype for Business users. This is awesome, because it means that IT is no longer required to make every little tweak to the Response Group once it’s set up.

I think this is a terrible description of the function, because it affects Workflows, Queues and Groups.

Once you’ve delegated management of a Response Group, the manager can use the Skype for Business Control Panel and the Response Group Administrator Tool to manage things like Workflow hours, Queues and Groups, messages, schedules and IVR workflows – all the stuff that IT guys don’t want to do. They cannot create or delete workflows, or change the SIP address and telephone number – all the stuff that would break things that IT would then have to fix.

Note that when Response Group is set to Managed, the Queues and Groups cannot be shared with any other Response Group, even if they have the same manager. This makes a lot of sense, if one manager has created Queues for their business unit, another business unit manager shouldn’t be able to use or modify that Queue for their own purposes. You can assign multiple managers to a Response Group, if you need to.

The default is Unmanaged, which means that only members of the CSResponseGroupAdministrator group can create or edit Response Groups. It’s probably a bad idea to simply add a user like the manager of your account department to this group, it grants them too many permissions and then break all your stuff.

Activation, Federation, and Anonymity

CoreActivationFederationAnonymitiy

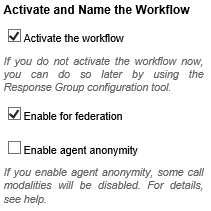
Activation is straight-forward. Deactivating the Workflow means your Response Group isn’t going to take calls, but the number and configuration remain assigned. I use this often when I need to preconfigure a Response Group, but don’t want calls coming in to agents quite yet.

Turning Federation on means that users in Federated organizations can place a Skype call to the Response Group instead of needing to call via the PSTN. Since you can always call via the PSTN, turning this off offers no security benefit. If you do leave it on, make sure you test from a Federated client as well as the PSTN. I’ve seen some firewalls prevent a Federated caller from getting to a voicemail from a Queue timeout, but PSTN callers work just fine.

Enable Agent Anonymity is our last option. As the italic text from Microsoft indicates, this does limit some functionality. What it does do, is allow a user to place a call as the Workflow, so that their personal details are not revealed. This is great for helpdesk scenarios, where you don’t want people finding out how to contact your help desk staff individually and directly.

Gotcha! If a user is home on one pool, and a Response Group is on another, the Anonymity function is not available. The Skype for Business Windows client is the only client that I’m aware of that can do Anonymous calls – no phones currently support this function.

The limitations that Microsoft is referring to are minor for phone calls, and typically involve other modalities. For example, you can’t start an anonymous call with IM or video, you have to start with voice and then add the other modalities. If your goal was to have an IM session, it seems like overkill to have to phone the other person before you can flip IM on… Anonymous calls do not support conferencing, screensharing, file transfer, whiteboards, and recording.

Step 2: Select a Language

Use the drop-down to indicate what language you want the Response Group service to use for speech recognition and text-to-speech.

Step 3: Configure a Welcome Message

Step3Welcome

You can choose to play a welcome message to callers, either text-to-speech or something you record. Text-to-speech is great for testing, but not very professional sounding. You can use Audacity or the Windows sound recorder to record a WAV or WMA format greeting, and upload it here. Greetings that you’ve uploaded remain available. You can record all of your greetings at one time, upload them, and then select them as you need them. I’ve seen “closed unexpectedly due to weather” or special holiday greetings used.

Greig has a comprehensive post on audio formats on his blog. I either remember that he’s done this work and refer to it, or I find it in the top results when I do a search.

Step 4: Specify Your Business Hours

This section lets you configure your timezone and business hours, and set actions for when you are outside of your business hours.

Step4Hours

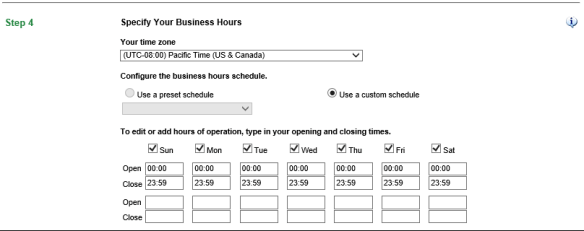
You can define preset schedules via Powershell and select them here, or you can select “use a custom schedule” and enter your hours in the table. Note that opening hours start at the beginning of the minute, and closing hours end at the end of the minute. When you see 00:00 to 23:59 as defaults, that’s a full 24 hour day. You have two open and close times available, which lets you close over lunch time (or nap time).

There options for you to play a “sorry, we’re closed” message, these are the same as the greeting.

Step4OutsideMessage

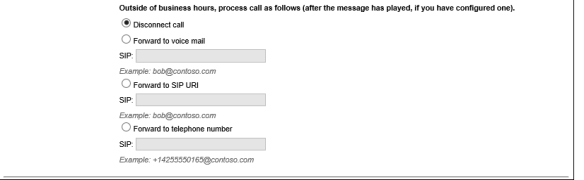
Finally, there are options for how to handle the call after-hours, these are self-explanatory. If you’re going to disconnect the call, please be kind and tell the caller to call back later in the after-hours message.

Step4Action

Step 5: Specify Your Holidays

This option is similar to the after-hours configuration, but is for entire days versus hours or minutes. You configure “holiday sets” via Powershell, but please don’t do this unless you have an irrational love for PowerShell.  These two tools the Holiday Set Editor and Lync Tools will save your sanity.

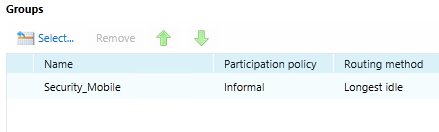
Step 6: Configure a Queue

This is where you pick the Queue that you want this Workflow to deliver calls to. If your Queue isn’t here, you likely started creating or editing the Workflow before the Queue was in the Skype for Business database. You can pick another Queue, save the Workflow, then edit it again to pick the correct Queue. If you haven’t yet created a Queue, you’ll need to start your Workflow configuration again.

Step 7: Configure Music on Hold

Response Groups come with a default music on hold that will play when users are in the Queue. You can configure your own music, by uploading the file here. There are no options for having a voice pop in every few seconds to remind people about how important their call is. If you want to do this, you’ll need to splice together your messages and your music file. Audacity can handle this for you.

I’ve seen a couple of organizations who have a recording of ringback that they use as hold music. This is illegal in some jurisdictions, but it’s also pretty annoying as the caller has no idea that they’ve been Queued unless you have a greeting. Be nice, configure a greeting, and play the default music or another music file suitable for callers to your organization.

Up next: Response Group Timers and Group Routing Method

I’ve talked a bit already about the two timers in Queues and Groups, as well as the Group Routing Method. I feel that these items need at least one post of their own to get a good feel of how they work together, so that will be covered more in an upcoming post.

Main Number Handling – Response Groups Pt 2 – All About Queues

This post is a part of my series on Main Number handling, and you may want to start with the introduction first.

Queues are where all of the magic happens in Response Groups.  As with Groups, you need a Name and can provide an optional description. Naming standards are your friend!

NameDesc

Next up, you can specify a list of Groups to receive calls from this Queue. If you specify multiple Groups, you can order them and the Queue mechanism will use the list, in order. How long the Queue spends in each Group is up to the timer you configured in the Group – more on timer interaction in a future post.

Groups

Next up we have Time-out and Overflow handling options. They’re disabled by default, which means that the Response Group will cycle through the Groups you’ve allocated indefinitely. That is probably less than ideal, so let’s dive into setting up Time-Out and Overflow options. Note that both have “overflow actions” – the options for these are the same, so I’ll discuss them last.

TimeOutOverFlow

The first thing you can specify is the Time-Out period, in seconds. It defaults to 20, but you can set it anywhere from 10 to 65535 seconds. For those of you who aren’t good at division in your head, that’s about 18 hours.

For Overflow, you can set any number between 0 and 1000, which should cover just about any scenario you’d deploy on RGS. (The ability to specify 0 calls is a hidden gem, since it can provide an instant overflow. More on how to use this in a future post.) Overflow allows you to select the first or last call into the Queue to perform the Overflow action on. Generally I see this set to the “last call”, otherwise someone who’s been on hold in the queue the longest gets kicked to voicemail (or wherever) and the next person in the queue might wind up being connected with an agent moments later.

Call actions are pretty comprehensive. You can:

  • Disconnect the call (I’ve never seen anybody do this, but you can!)
  • Forward the call to a voicemail. Use the format ‘sip:bob@domain.com’. Note that Bob has to be enabled for SfB an EV for this to work.
  • Forward the call to a telephone number. Use the format ‘tel:+14255551212@domain.com‘ where @domain.com is your SIP domain. You would do this even if the phone number is external to your organization.
  • Forward the call to a SfB user. Use the format ‘sip:bob@domain.com’. This is the same format as the voicemail example, so make sure you’ve got the dropdown set to the right destination type.
  • Forward the call to a different Queue. This is nice when you already have a Queue setup. Let’s say you have a Queue for your Receptionists. reception gets overwhelmed with calls, you could have the Queue overflow to the Accounting Queue so that they can help out and answer some of the calls.


CallActions

And that’s all for Queues. The next post will have an overview of Response Group Workflows, the third component of Response Groups, and the first part of the Response Group that handles your call.

Main Number Handling: Response Groups, pt 1 – Intro and Groups

This post is part of my series on Main Number handling. The most feature-rich call handling solution native to SfB is Response Groups. Response Groups, while nowhere near a full contact center, offer a great deal of flexibility and capability for an organization.

In the overview post, I provided a brief outline of Response Groups – they are an on-prem solution that offers hunt groups or IVR trees to assign calls to a Queue, and you can designate agents to handle the calls within that Queue. Response Groups are comprised of a Workflow, that receives and processes the call, passing it off to a Queue. Queues have Agents that are offered the call. To “Offer a call” is Microsoft’s terminology for the Response Group service ringing a particular Agent’s phone, so that they have the option to answer the call.

You might think at first that the Workflow would be the best place to begin any kind of deeper explanation. I’ve found that the opposite is true, so let’s being by taking a look at Groups, and since a picture is work a thousand words, here’s a screenshot of where to find the Response Group configuration page in the SfB Control Panel:

groupincscp

You can see the three components: Groups, Queues, and Workflows. The components are homed on a Front-End Pool, so you will need to select a pool each time you create or edit one of these objects.

Diving into Groups and selecting New, we see this page (it’s the same page for editing):

newgroupcloseup2

Note that while these components are homed on a particular pool, users who are Agents in a Group can belong to any on-prem pool in your organization.

The Name and Description fields are self-explanatory. Note the red star indicating that the name is a required field. You can edit the name after creation, but make things easy on yourself and come up with a naming scheme before you start.

Note that you’ll need names for Groups, Queues, and Workflows. If you call all three components “sales”, life can get confusing for you, especially if you find yourself in PowerShell. The easiest way to alleviate this is to add _Group or _Queue to the end of the name for these components. Users never see these names, so don’t worry about confusing them.

Great naming standards are always a win in my books, but do feel free to leave notes in the description field that provide more insight into the purpose of the group.

Participation Policy has two options, Formal and Informal:

  • Formal requires your agents to sign in and out of the Response Group. You do this via a web page and not just a button on a phone or in the client. I personally find this annoying. The lack of other Contact Center functionality in Response Groups makes Participation Policies somewhere i
  • Informal means there’s no login/logout required. You are essentially always logged in. This is the most common selection that I see.

Alert Time  is generally how long SfB will offer a call to the Agents before it’s passed back to the Queue. There are two timers in Response Groups, one at the Group level and one at the Queue level. Any decent conversation about these timers needs to include how the two timers work together for you (or against you, if you’re not careful) so more on timers in the upcoming post on Queues.

Routing Method is the pattern that the Response Group service user to select Agents to offer calls to. Your options are:

  • Longest Idle: The Agent who has been idle the longest, as long as their presence is Available or Inactive.
  • Parallel: The call is offered to all Agents whose presence is Available or Inactive.
  • Round Robin: The call is presented to each Agent based on the list of Agents, so long as they are Available or Inactive. The RG service keeps track of the last agent that was offered a call, and will start with the next agent for the next call. Over time, you will get a roughly equal distribution of calls, assuming your agents have similar presences statuses for similar amounts of time.
  • Serial: Similar to Round Robin, but follows the order of the agents as you have them in the Agent list, so long as that user is Available or Inactive. Unlike the Round Robin option, the RG service will start again at the top of the Agent list for the next call. This is a great way to prioritize your agents so that one person typically answers calls, but calls will immediately go to their backup(s) if they’re not available
  • Attendant: The RG service will offer the call to all agents, regardless of their presence (Save for DND and Offline). One key difference is that the calls will “stack up” in the Agent’s notification window, and they can cherry pick which call they answer. On the downside, agents will hear ringing and see toast for each call that is coming in. If you have a lot of calls stacking up, this gets really annoying. (Use Queue overflow settings to alleviate this)

Agents are last. We have a dropdown that allows you to build your own ordered list of agents, or select an existing AD distribution list. The distribution list can be a great option however there are a couple of gotchas:

  • The Response Group service is updated overnight through SfB maintenance processes. If you need to add an agent to a group faster, you can either fiddle with triggering updates manually or use the “customer group of agents” option instead.
  • The Response Group service can’t take advantage of nested groups. Only direct members of the group you select become agents.
  • Agents must be enabled for Enterprise Voice.

Gotchas to watch for when adding a user as an Agent to a Group in a different SfB Topology Site

  • An user in the same site as the pool hosting the Response Group will receive a banner on their client advising that they’ve been added to the Response Group as an Agent. A user outside of that site will not receive any notification that they’ve been added to a Group.
  • An Agent in one site cannot place calls on behalf of a response group in a different site.
  • When an agent hits their default logon/logout page via the client, it will only have Response Groups from their own site. They’ll need to manually bookmark the login/logout page for any other sites that host Response Groups that they are a member of.
  • You can leave a group without any agents defined, but you cannot use that group for anything. (Stay with me here, this applies in a more advanced call handling scenarios that I’ll get to later).

And that’s it for Groups. Next up will be a post on Queues, where all of the interesting stuff happens.