This post is a part of my series on Main Number handling, and you may want to start with the introduction first.
Queues are where all of the magic happens in Response Groups. As with Groups, you need a Name and can provide an optional description. Naming standards are your friend!

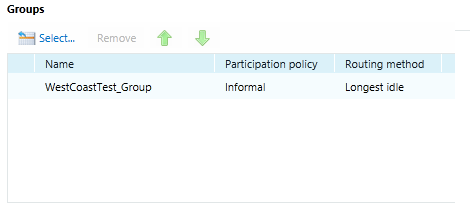
Next up, you can specify a list of Groups to receive calls from this Queue. If you specify multiple Groups, you can order them and the Queue mechanism will use the list, in order. How long the Queue spends in each Group is up to the timer you configured in the Group – more on timer interaction in a future post.
Next up we have Time-out and Overflow handling options. They’re disabled by default, which means that the Response Group will cycle through the Groups you’ve allocated indefinitely. That is probably less than ideal, so let’s dive into setting up Time-Out and Overflow options. Note that both have “overflow actions” – the options for these are the same, so I’ll discuss them last.
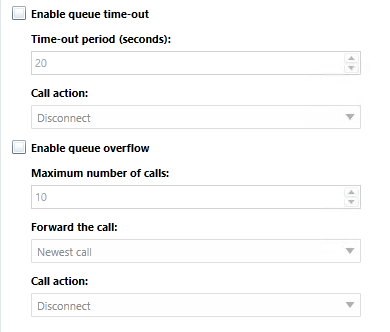
The first thing you can specify is the Time-Out period, in seconds. It defaults to 20, but you can set it anywhere from 10 to 65535 seconds. For those of you who aren’t good at division in your head, that’s about 18 hours.
For Overflow, you can set any number between 0 and 1000, which should cover just about any scenario you’d deploy on RGS. (The ability to specify 0 calls is a hidden gem, since it can provide an instant overflow. More on how to use this in a future post.) Overflow allows you to select the first or last call into the Queue to perform the Overflow action on. Generally I see this set to the “last call”, otherwise someone who’s been on hold in the queue the longest gets kicked to voicemail (or wherever) and the next person in the queue might wind up being connected with an agent moments later.
Call actions are pretty comprehensive. You can:
- Disconnect the call (I’ve never seen anybody do this, but you can!)
- Forward the call to a voicemail. Use the format ‘sip:bob@domain.com’. Note that Bob has to be enabled for SfB an EV for this to work.
- Forward the call to a telephone number. Use the format ‘tel:+14255551212@domain.com‘ where @domain.com is your SIP domain. You would do this even if the phone number is external to your organization.
- Forward the call to a SfB user. Use the format ‘sip:bob@domain.com’. This is the same format as the voicemail example, so make sure you’ve got the dropdown set to the right destination type.
- Forward the call to a different Queue. This is nice when you already have a Queue setup. Let’s say you have a Queue for your Receptionists. reception gets overwhelmed with calls, you could have the Queue overflow to the Accounting Queue so that they can help out and answer some of the calls.

And that’s all for Queues. The next post will have an overview of Response Group Workflows, the third component of Response Groups, and the first part of the Response Group that handles your call.

Pingback: Main Number Handling – Shared Line Appearance | Bump in the net