I'm a Microsoft Certified Solution Master for Communication, aka Skype for Business. As a consultant I work in all areas of SfB design, deployments, and support, with a particular focus on voice workloads, networking, and high availability.
Teams emergency call notifications meet all of the requirements of Kari’s Law, but they’re not super flexible. Microsoft received a bunch of feedback on this, and have a great solution.
At the most basic level of notification, you send a Teams chat message to a group of people. You can then layer on conferencing those same people into the emergency call, with or without the ability to unmute themselves. The users conferenced into the emergency call are the same list of users who receive the text notification, which isn’t great in some circumstances. For example, I would like to notify the intern sitting at the reception desk that an emergency call has been placed, but I would not want to conference them into a live emergency call. Anyone being conferenced in should be in the security department or similar, and not more “pedestrian” roles in the organization.
I recommend against allowing the ability to unmute, in most circumstances. The very last thing that a busy emergency call taker wants/needs is somebody unexpected talking over them as they’re trying to get the right response rolling. Unmute may be beneficial to a well-trained group of people who know to use it very selectively. The rest of us can just call 911 from a different phone, talk to a different call taker, and provide any additional information.
There’s also the option to conference in just one external phone number (which can also be just one internal number), with no method for them to unmute. This is a good option for a security desk where the staff don’t have Teams clients, or for a mobile phone.
For a more complex scenario – chat message to these people, email to these other people, conference in these Teams users, flash a light – there was no option in Teams that supported them. If an organization was using Direct Routing, some emergency service providers could offer additional services, and some people figured out how to have SBCs trigger a web hook when an emergency call was placed.
Microsoft has recently announced a preview of Graph API, with details available here. This API will provide the same information that Teams provides in its notifications, as well as to emergency services. As I become aware of services and apps that can consume this information, I’ll add their details to this post.
It is not an “either/or” choice of using the API or notifications built into Teams. You can easily configure both, using Teams for basic notifications, and the Graph API (and supporting applications) for richer flexibility.
If you have multiple SBCs (and trunks) in your Direct Routing deployment, you may have a scenario where a call comes in one trunk and then is automatically redirected out a different trunk by an Auto Attendant or Call Queue.
This could be because the destination is in a different country or rate center and you want to avoid long distance charges. I’ve also seen this in scenarios where a call comes in from the PSTN but then needs to be forwarded out a different trunk to a PBX or contact center, typically with an extension or private number that can be routed via the PSTN.
Resource Accounts that are under the hood of call queues and auto attendants need to have a voice routing policy assigned to them in order to send calls out a direct routing trunk. If that voice routing policy contains the SBC that was used for the inbound call, that SBC will automatically be selected for the outbound call, regardless of any priorities that you configure. If everything is configured properly, a REFER message will have the SBC (or something further upstream!) handle the forward and remove Teams from this loop.
However, if you need the call that came in via the first SBC to egress via the second SBC, you will need to create a voice routing policy that uses the second SBC and does NOT contain the first SBC. This voice routing policy gets assigned to the resource account for the call queue or auto attendant that is doing the forwarding.
If you are in a scenario where you have an auto attendant that is doing forwarding to numbers that must be reached via both of the SBCs, you will need to have one of the SBCs involved, or you’ll need configure the SBCs to route between each other and have Teams configured for direct routing to only the main SBC. Ideally, this would be your configuration anyway – Teams is not an SBC or session manager and should only be used as a last (hopefully temporary!) resort for oddball routing scenarios like this.
Failing that approach, you may be able to have the auto attendant or call forward to a Teams user and have that user set to call forward via the second SBC. You will need to test this, it’s entirely possible that there is/was something in my lab configuration and/or Teams call routing when I configured this, that does not apply to your scenario.
Teams Auto Attendants have a scheduling feature, which includes providing alternate call handling options during holidays. This isn’t well explained, and the flow within Teams Admin Center isn’t…. flowy. Once you understand a couple of key nuances, lightbulbs start going off.
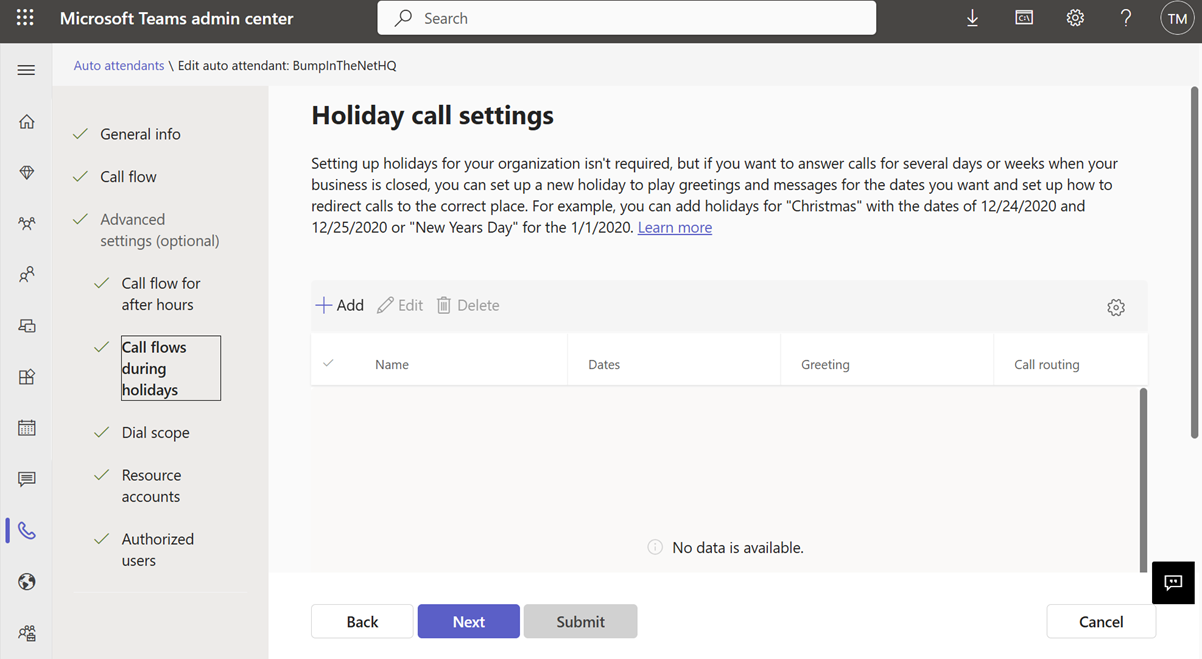
If we have an Auto Attendant (AA) called “BumpinTheNetHQ” and want to setup Christmas and New Years holidays, we’ll see something like this in TAC:
Now if we click “+Add” we are prompted for a name for our holiday call setting, a spot to pick a Holiday, and then call handling things like a greeting and where to route/how to handle the call:
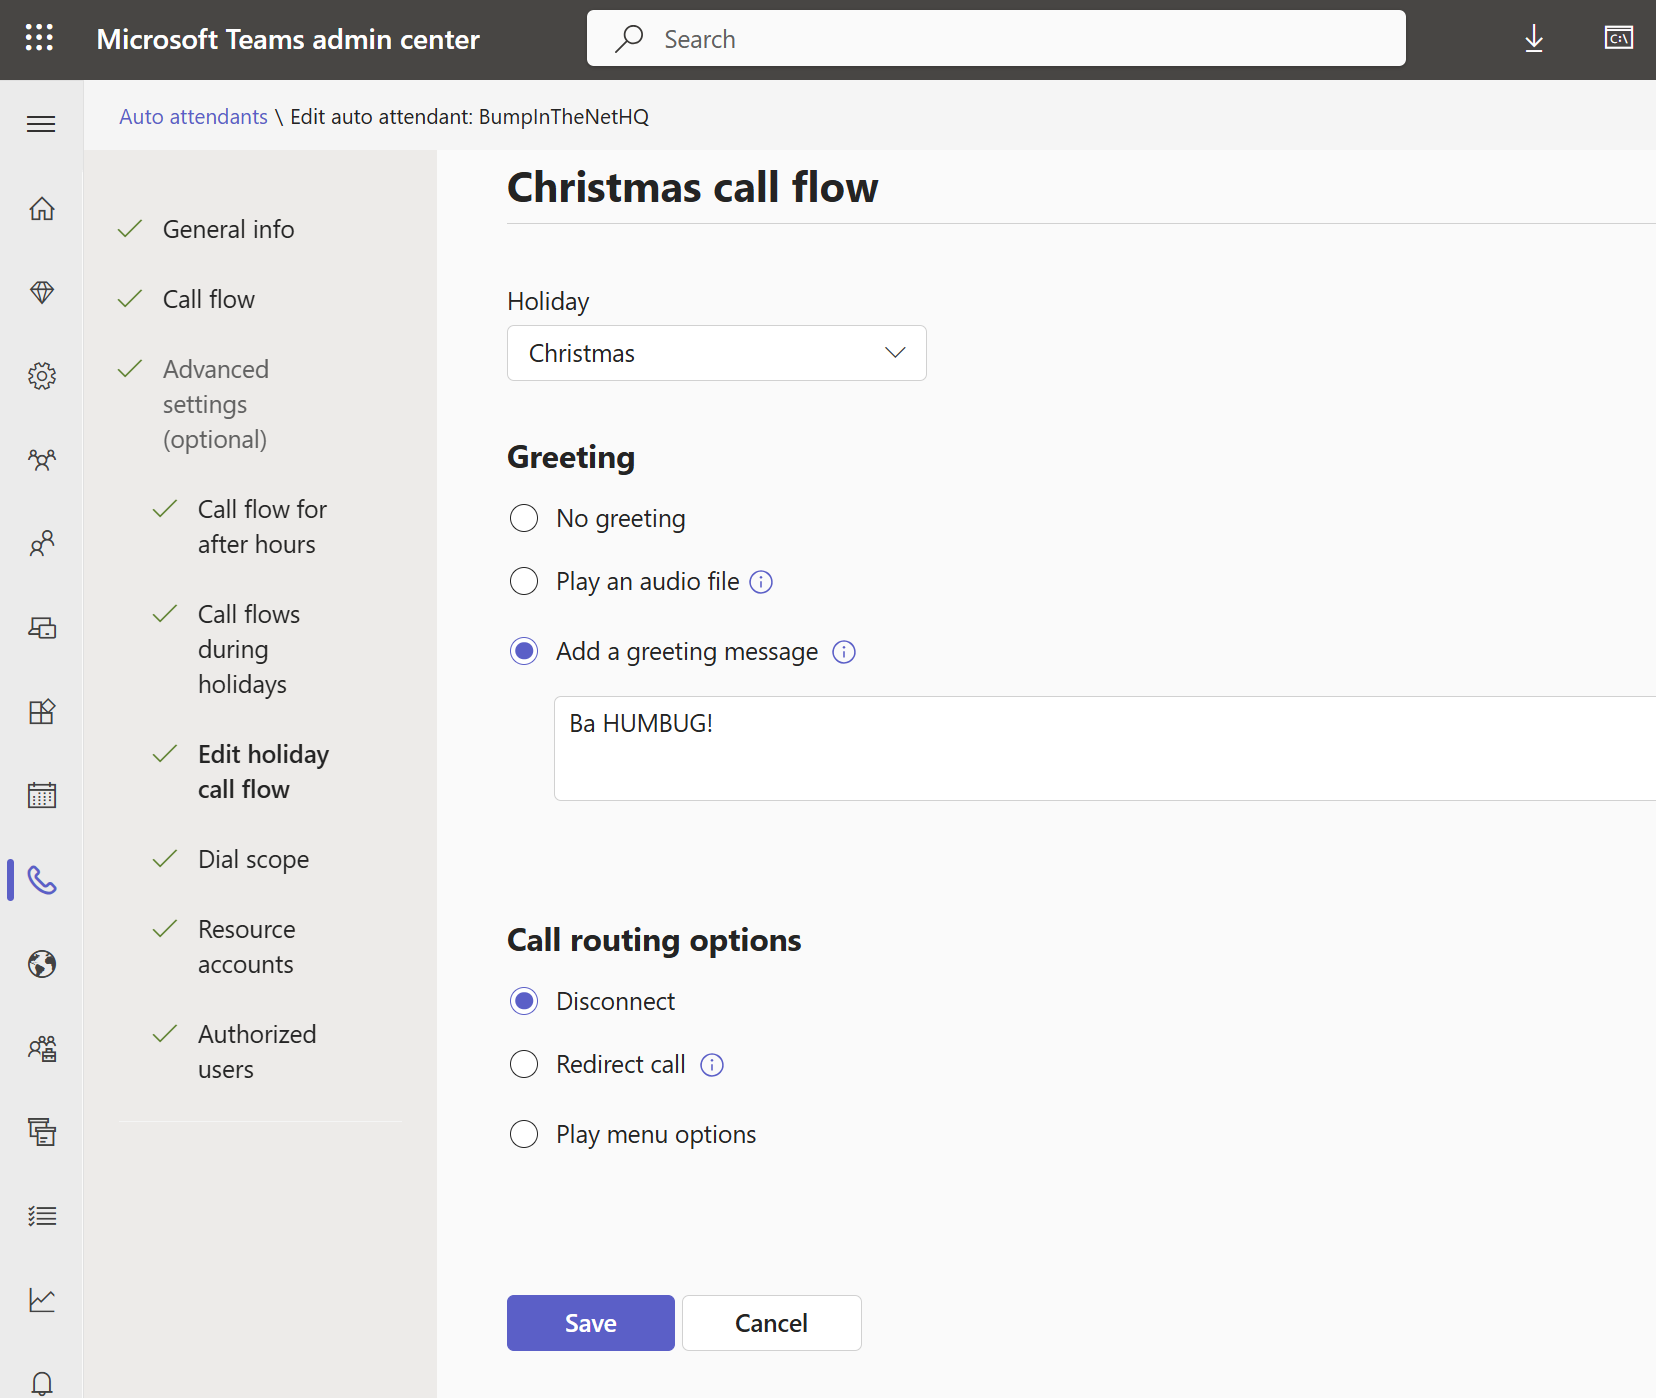
For the name of you holiday call setting, you should make it descriptive. In this case, I’m building the call flow for Christmas. I’ve included the “call flow” bit rather than just calling this Christmas, as I find it helps me keep all of the various uses of “Christmas” straight – especially if I’m working in PowerShell.
Note that you CAN edit this name, which is fantastic for tidying up to keep things a bit more understandable.
Here I’ve also assigned a “Holiday” called Christmas (more on that later!) and I’ve configured the Auto Attendant to speak “Ba Humbug!” before disconnecting the caller:
And if I click save, I am back at the Holiday call settings page:
I can click +Add and configure a New Years call flow as well:
Giving me this for Holiday Call Settings:
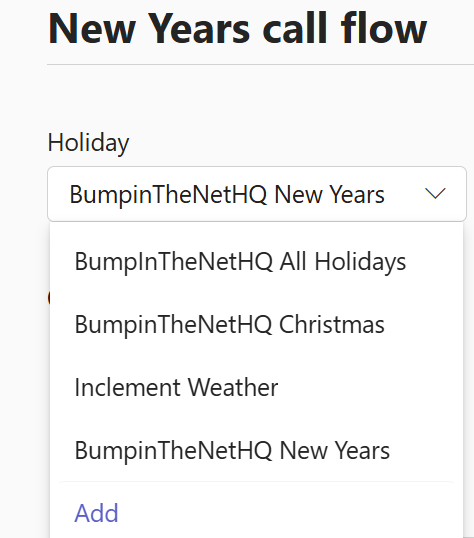
And this is “later”, so let’s talk about this Holiday drop down:
When you’re using this dropdown, you are presented with a list of ALL holidays configured in your Teams tenant, as well as an option to create a new Holiday:
Note that I’ve got the name of my Auto Attendant at the front of the Holiday name. That’s important to have as your different Auto Attendants for different departments may all have different schedules for the same holiday.
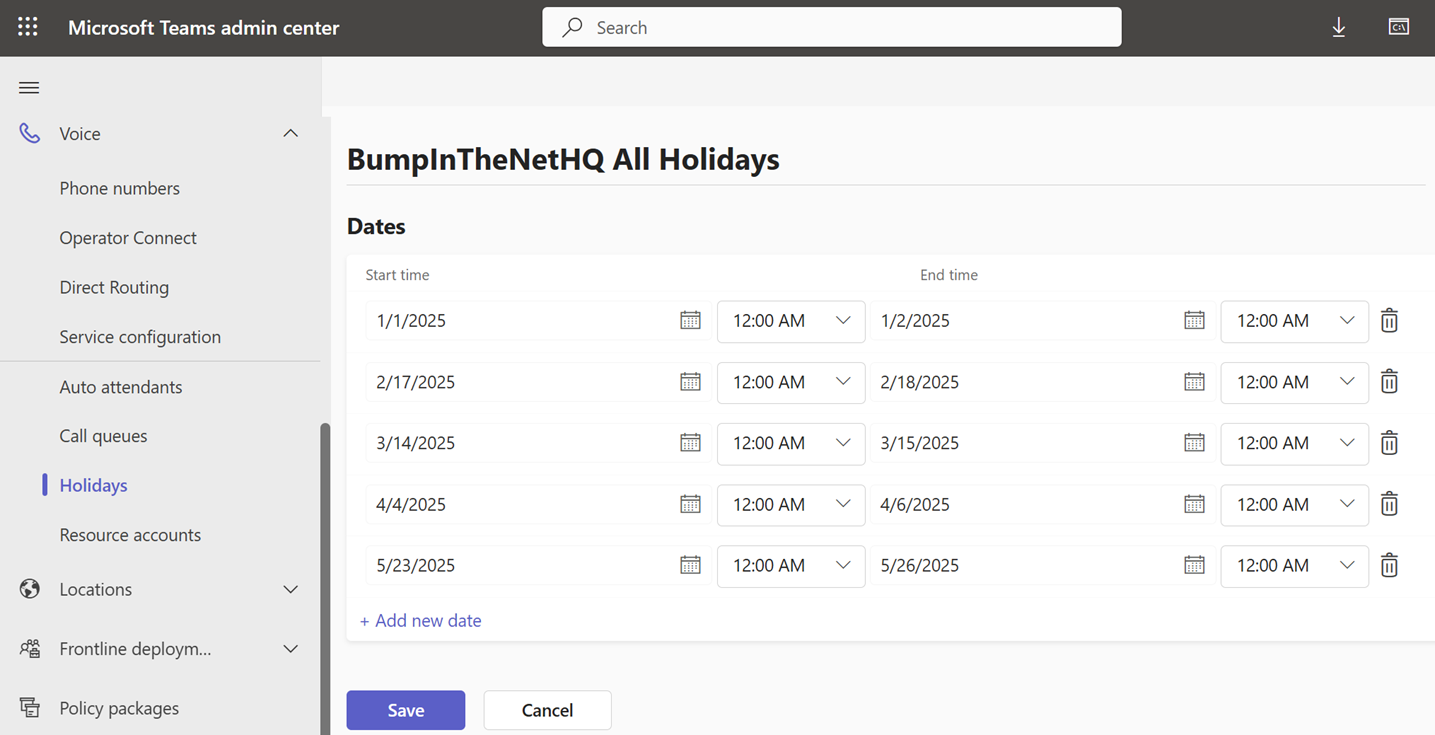
You can better administer Holidays through the Holiday section of the Voice menu on the left menu. Here we can see a list of all of the Holidays configured in Teams, plus the start of the dates that are configured for that Holiday. Note that you don’t get to see times here, and a long list of Holiday Dates may not fit on your screen.
Note that you CAN rename Holidays, just as with call settings.
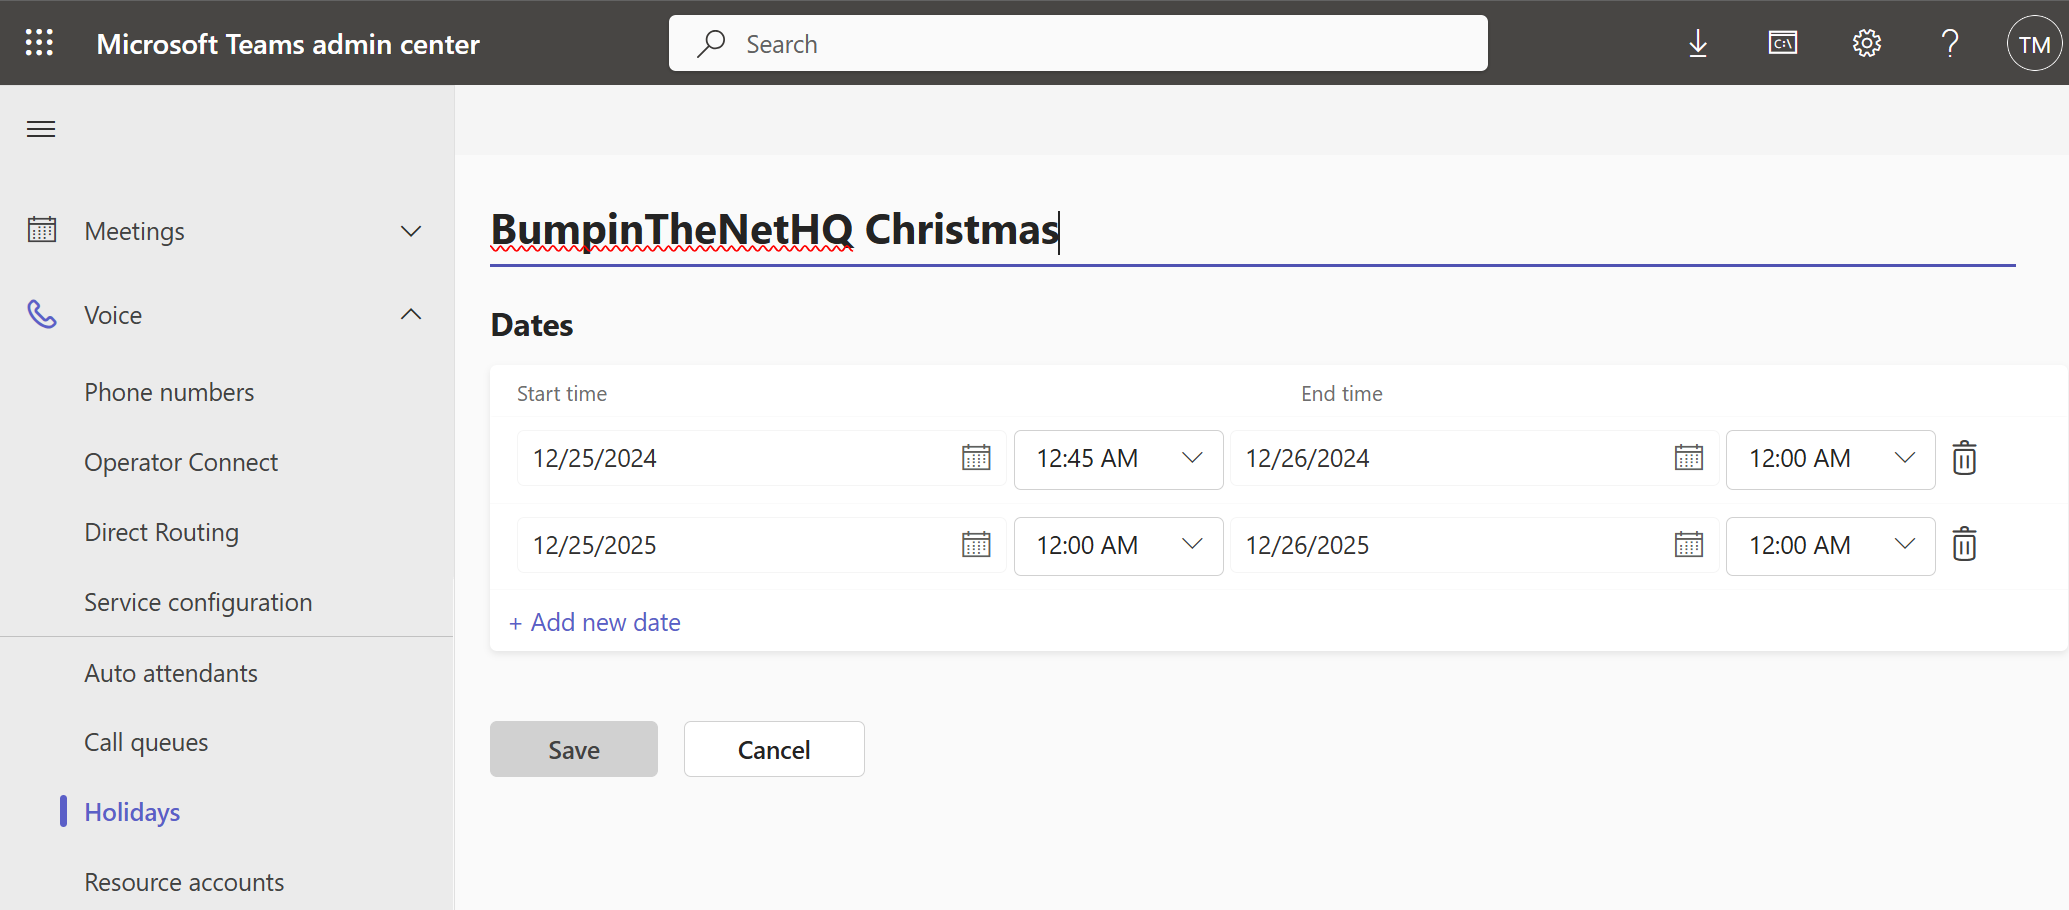
We haven’t talked about times yet, or about multiple dates for a Holiday, so clicking on BumpinTheNetHQ Christmas gets us this:
I’ve defined Christmas for two years here, and I’ve also fiddled with the start time for Christmas 2024. If your organization (or department) closes early on Christmas eve, you could set the start time to 12/24/2024 and 2:00pm, for example. You can also cheat ahead and configure multiple years’ worth of holidays. Just be sure to put a reminder in your admin schedule/runbook/Outlook/whatever so that you remember to come back and update them (unless you plan on winning the lottery before they run out, in which case it’s not your problem!)
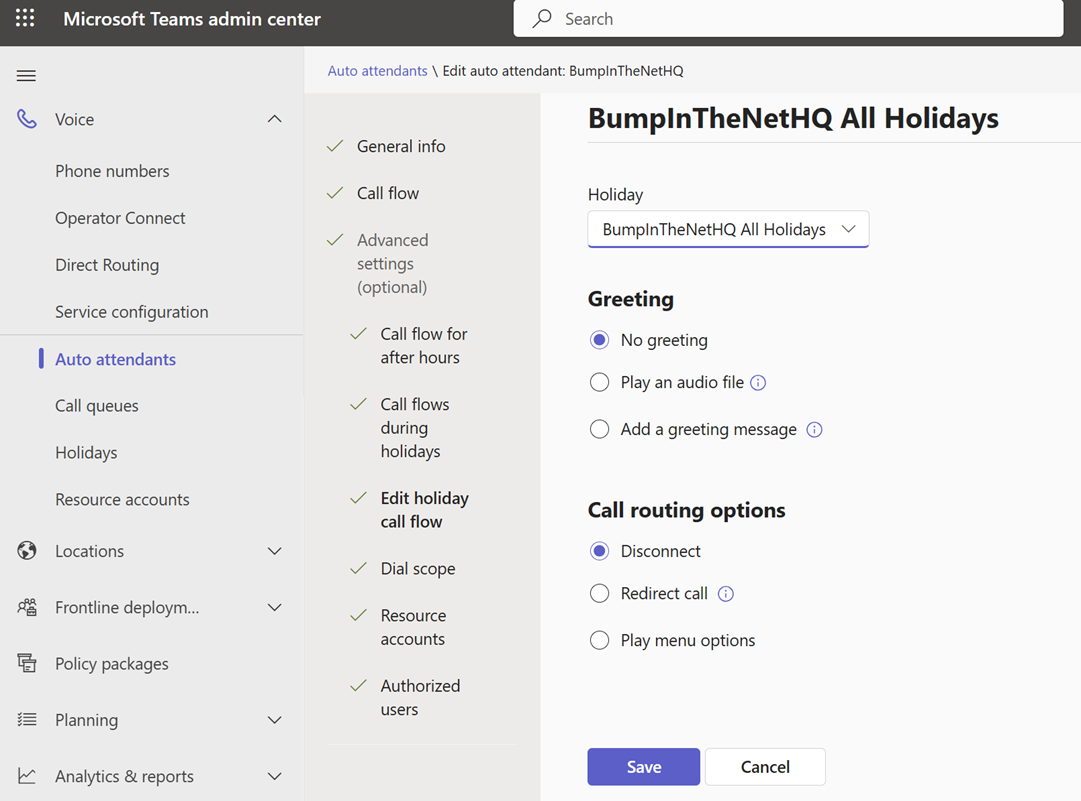
Eagle-eyed readers will have spotted the “BumpinTheNetHQ All Holidays” Holiday. Above, we have different call handling for our Christmas (Ba Humbug!) and New Years (the countdown message) Holidays. This is very flexible for different greetings and handling if that’s desired for your Holidays. However, if you don’t differentiate between Holidays with how they’re handled – say you just play a “we’re closed for the holiday, please leave a message and we’ll get back to you” greeting and dump the caller into voicemail for every Holiday – you would wind up having to manually duplicate (or dive into PowerShell) all of your call flow options. I’m using simple greetings and “disconnect” as an example here, but if you have a number of options “Press 1 for xxx, Press 2 for yyy…” that’s a lot of work to create and maintain.
Instead, you can build something like the “BumpInTheNet All Holidays” Holiday:
And use that with your single holiday call setting. Here we’ll just unceremoniously disconnect all callers on the above holidays:
The downside to this approach is that there is no description for each of the day/time entries in the Holiday. Some are obvious, some aren’t, especially if you are an international or multicultural organization.
Let’s just back to the “BumpIntheNetHQ” prefix on all of my holidays to reinforce that – every Auto Attendant will have an option to pick any existing Holiday that’s defined in a tenant. Starting the name of the Holiday with the name of the Auto Attendant that it applies to, or the department or team or whatever if there are multiple AAs that share the same exact Holiday set, will prevent a lot of grief.
If you’re just starting out with your Teams deployment, please spend some time building out a couple of Auto Attendants with a bunch of different Holiday structures so that you can understand how they work before you start deploying. You don’t need a phone number to call an Auto Attendant, you can call by name. You also don’t need to play a bunch of different menu options (unless you’re exploring those) – keep it simple and play a silly fun message to let you know where you wound up, and then just disconnect the call.
If you’re a visual/flow-chart type of person, here’s a visual of how these bits connect:
Or if you prefer the “one Holiday call settings, many Holiday date/time entries” approach:
My previous post dealt with having calls to a Teams number forwarded to a destination outside of Teams. What about if we want a number forwarded to a different destination that in our own Teams environment? You might want to do this for a departed employee to ensure calls to their number don’t get missed. You might merge two or more Auto Attendants in to one but still want all of the phone numbers to work. Easy peasy!
Fun fact, unassigned number rules work for calls from the PSTN, but also from within Teams. All your bases are covered, with the exception of a federated call or chat.
In Skype for Business this function was handled via the CsUnassignedNumber policies. In Teams, it’s handled by policies with the unwieldy name of CsTeamsUnassignedNumberTreatment.
While unassigned number handling can be configured in PowerShell if you’re doing a large number of rules, it’s otherwise easier to use TAC, especially for viewing what the rules are.
In TAC, you’ll find what you’re after under Voice, then “Routing rules”. That’s easy to overlook as “routing” is used in so many other places.
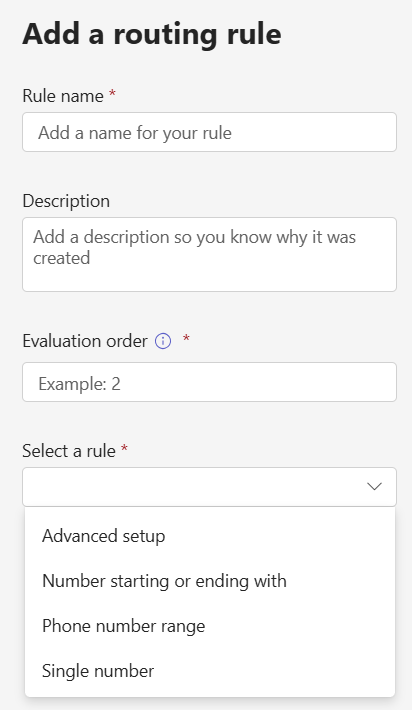
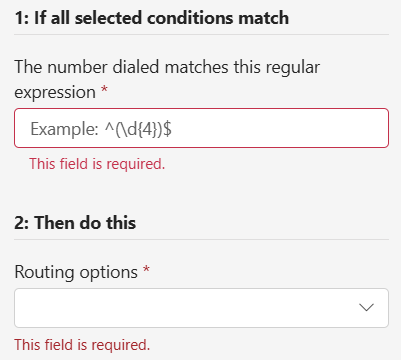
If you click Add, you get a pane that has these items:
Rather than throw any name and description in, plan out a bit of a naming standard. You’ll thank yourself later once you’ve got a few dozen rules. Something like “+1 425 8675309 to David” isn’t as meaningful as “1 435 8675309 to DSmith at Contoso.com” with a description of “1 425 8675309 used to belong to Jenny Jones. Ticket 342352” is much better. Note the inclusion of your ticket number so that you can find more details (and so you don’t have to write the full story here).
Evaluation order is next. The rules are evaluated from top to bottom, and evaluation order establishes where this rule will go. You can’t insert a rule by using an evalution order that’s identical to an existing one, you will need to pick an unused number. You can sort the rules after to wiggle everything in to the right spot.
And finally, we have the 4 rule types:
Advanced Setup lets you dive into Regex (more on step 2 in a bit!)
Number starting or ending with is a nicer version of Advanced, where the full capabilities of regex aren’t required. Just for fun, when you hit Okay and this rule hits the rules list, it’s in Regex format. Resistance is futile, you cannot escape Regex…
Phone number range is similar, and also generates Regex, which can get pretty gnarly for ranges:
And the final option is a single number, which is wonderfully, elegantly simple. Simple enough that I’ll skip the screenshot!
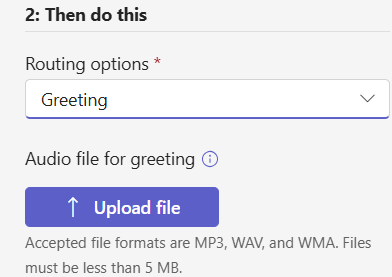
Step 2 is “then do this”, and your options are:
Greeting lets you play a greeting file (no text to speech here), and then the call is disconnected.
Your next option is “person in organization” which is pretty self explanatory: Jenny’s calls go to David, and that’s it.
The third option is a voice application, which is usually an Auto Attendant or Call Queue. If the first option of playing a greeting and disconnecting doesn’t work for you, you can use this option to send calls to an Auto Attendant, play a greeting (including text to speech) and then take some other action – let callers select from a menu of other options to handle their call.
And here’s something cool. The rules you build are processed in order, until there is a match. You can put very specific rules at the top, and less specific rules at the bottom, from the same range. For example +1 425 8675309 to send Jenny’s calls to David, and then +1 425 xxxxxxx to send that range of calls to an auto attendant.
But wait, there’s more! The unassigned numbers rules are the LAST thing that Teams does with a call before it sends back a “404 not found”. That means you can build a rule like +1 425 xxxxxxx to send all calls that hit it to an auto attendant. If Jenny still works for the organization, calls to +1 425 8675309 will reach Jenny and won’t ever make it to the unassigned rules. This is a great way to ensure that calls to an organization that may face large turnover are handled, without spending all day building and sorting rules.
There are a number of use cases for an organization to want to permanently forward calls to a Teams number, to a number outside of Teams. It could be that a function that used to be internal is now external, and there’s a desire not to change the number. An HR benefits hotline is one use I’ve see for this.
Your carrier may be able to setup a permanent forward for you, or if you’re using Direct Routing you may be able to setup the forward on an SBC. If you’re on Operator Connect your carrier may not offer this, and Microsoft does not offer it with Calling Plans. Additionally, these forwarding options would not have an object in the Teams directory that could be searched by name.
You could setup call forward settings in a Teams client, with the number assigned to the Teams user. That requires licensing, which may not be acceptable.
A free solution is to use a Call Queue or an Auto Attendant. The phone number gets associated with the Resource Account, which also populates in the Teams directory to allow dial by name. The Call Queue doesn’t need agents, and the exception handing is set to forward the call to an external number. Auto Attendants have an immediate forward option, which is a little cleaner (and more obvious when you’re viewing the configuration). I like Auto Attendants here for the ability to set up different destinations based on business/after-hours/holiday settings for those scenarios where this could be useful.
In both Auto Attendants and Call Queues, a greeting can be played before the message is forwarded.
You would create a Resource Account like this:
And then from M365 Admin Center add the free Resource Account license. Then grab a coffee (it can take a few minutes for the license application to take effect and show in Teams) come back to Teams Admin Center and select the Resource Account and assign the phone number.
The “Assigned to” part being blank is okay, we haven’t created our Auto Attendant yet. Let’s do that now and setup the call flow:
(and under Resource accounts, we can hook the Auto Attendant to the Resource Account we created).
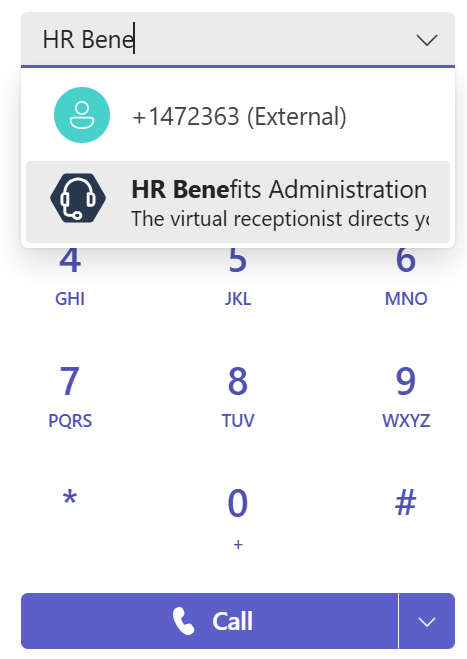
Now calls to +1 425 555 1212 will be automatically forwarded to +1 425 867 5309. Additionally, internal calls by looking up HR Benefits Administration by name are possible:
and these will hit the Auto Attendant and be forwarded to +1 425 867 5309
Okay, apologies for huge post title, but I wanted to make sure that all the important bits were represented.
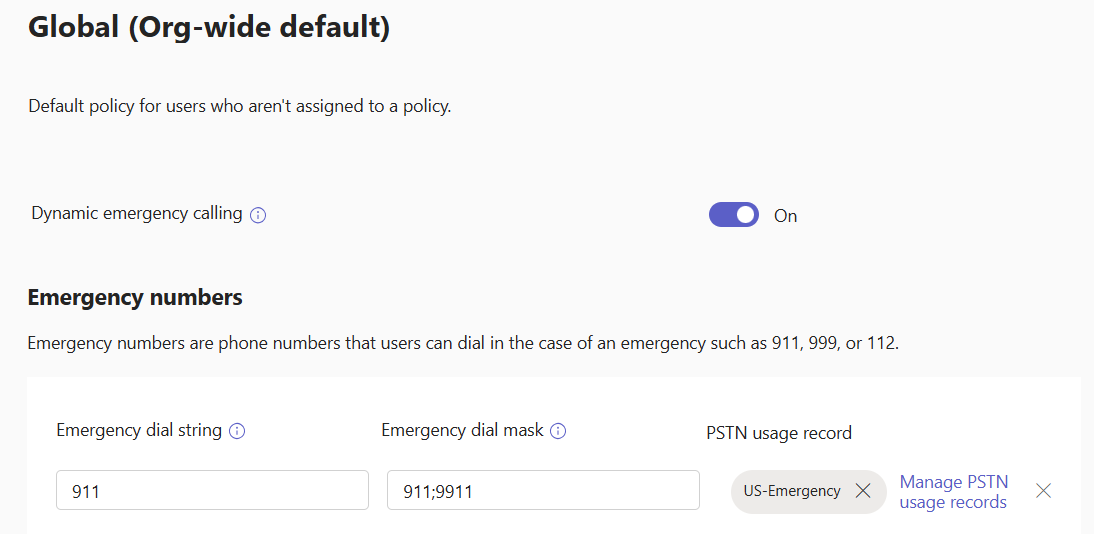
Teams has “Emergency Calling Policies” that handle location lookup settings and notifications, and “Emergency Call Routing Policies”, ECRPs. ECRPs establish Emergency calling masks and dial strings, along with a PSTN Usage which in turn points to a route to send emergency calls to. It might look something like this:
When this policy is assigned to a user OR to a site that a Teams client is in, this policy tells that client when 911 or 9911 are called by the user, Teams should call 911 vai the US-Emergency PSTN Usage.
The PSTN Usage is a Direct Routing configuration item that tells Teams where to route the emergency call. US-Emergency is where 911 calls go in the US, “DE-Emergency” might be the PSTN Usage for Germany for 112 calls. You wouldn’t want to mix those two up.
The Dial String and Dial Mask portion of the ECRP apply to ALL methods of PSTN access in Teams. That includes Direct Routing, and also Calling Plans and Operator Connect. CP and OC users will have emergency policies appropriate to their location/country set by the OC provider, or Microsoft in the case of Calling Plans. That includes dial strings and dial masks, as well as under-the-hood bits on call routing.
However, in my previous post I outlined changes to notifications for emergency calls that allowed different modalities and destinations to be configured for emergency calls to different Emergency dial strings. If you want “555” to be a number for security in a hospital with different notifications than when 911 is called, you need to first define 555 in an ECRP regardless of whether you’re using Direct Routing, Operator Connect, or Calling Plans. Then you can define the Emergency Calling Policy and appropriate notifications.
If you’re OC or CP and sticking with the basics of emergency calling and “911 is all we need”, you can’t escape needing to configure an ECRP if you are implementing Shared Calling. I mentioned above that OC and CP users have emergency policies pushed to their client by their OC provider or Microsoft (for CP). Well, if you are a shared calling user, you do not have a phone number assigned to you, and so you are not having the phone number and associated calling (and emergency calling) policies pushed to you. For regular calls, the Shared Calling number assigned to the Auto Attendant (it’s typically an Auto Attendant) handles call routing just fine – dump everything out to the carrier. For emergency calls, the Teams client needs to know the Emergency Dial Mask and Emergency Dial String. The only way for Shared Calling users to receive this configuration is via an ECRP. In the ECRP, you would NOT define a PSTN usage for OC and CP shared calling scenarios, but you would do so for DR scenarios. (The instructions on learn.microsoft.com are pretty good, should you venture into shared calling with OC or CP). This ECRP for OC and CP users is assigned to the user or it can be assigned to a site, maybe.
Note that if you have Direct Routing AND you want to use OC or CP for Shared Calling, things break a bit. Your OC and CP emergency calls should go to your OC provider or Microsoft (for CP). However, if you are also using DR and you’ve assigned a site-based ECRP that includes a DR PSTN Usage, that site-assigned ECRP takes precedence over the user-assigned CP and OC ECRPs. As a result, emergency calls from CP and OC users in that site will go to the DR provider. This could be very bad if that DR provide only accepts calls from their own numbers. It will only be somewhat bad if they’ll accept calls from any number but charge (typically three figures) to handle that call. Things might be okay if your OC provider is also your DR provider AND you talk to them and they’ll happily accept this scenario. Otherwise, avoid this scenario. Either don’t do site based ECRP, or use DR for your Shared Calling instead of CP and OC. AND, if you decide to not do site based ECRP and you are in the US, be aware that you are very likely in violation of emergency calling legislation that calls for automatic location determination… So, don’t do that, or hand this decision off to the corporate lawyers. (I’ll let you pick which is easier!)
Next up, I’ll show the configuration behind that scenario with the hospital using 555 for internal security notifications.
Teams Emergency Calling Policies (ECPs) fulfill some critical features. They have the setting to turn on or off “external location lookup mode”, which lets a user enter or confirm their address should they not be on a properly configured internal network, it allows a disclaimer to be displayed, and it determines who is notified when an emergency call is placed.
The emergency notification portion has just received an upgrade. There used to be only one notification option. This meant that IT staff using 933 to test emergency call routing would also be sending notifications, and it’s less than ideal to overwhelm notification recipients with testing.
Additionally, many countries have multiple emergency numbers – say one for police, one for fire, and one for ambulance – where different internal notification groups could be useful. For example, first aiders could be notified for calls to an ambulance but not a police scenario. I’ve also had organizations that wanted internal-only security numbers to generate internal notifications but otherwise not tie in to the 911 process. The scenario here was hospital security where someone may need security for access to a restricted area, or urgent security for an angry patient that was not yet a “get the police here” type of scenario.
The new ECP setup allows different notification groups and conference-call policies to be applied to a different “Emergency Dial String”, which is the emergency number that will be called. This is different than the emergency dial mask, which is the numbers that a user may enter to place a call. For example, the Emergency Dial String would be “911”. The Emergency Dial Mask numbers would be “911”,”9911″,”112″,”999″. Calling any of these four numbers will result in a call to 911. In the ECP notification settings, we define notifications for calls to 911, and not to the individual four mask numbers that could be dialed.
Here is an example configuration:
“Default” is what you will find for configurations that existed before this feature overhall. In North America that’s probably “911”. In a newly created ECP, you won’t see “default”.
Here I’ve set “artemis@torren.ca” to be notified via Teams chat when 222 is called. Should 123 be called, +14258675309 will be conferenced in – and here, no users will be send a Teams chat message.
This flexibility is a welcome addition to emergency calling in Teams!
I’ve used “dial string” and “dial mask” here, but haven’t covered where they’re defined. Adding a dial string number here alone won’t result in notifications. You will need to also configure an Emergency Call Routing Policy with the dial string(s) and dial mask(s) that you wish to use. This tells Teams to recognize these numbers as emergency calls, and for Direct Routing, tells Teams how to route those calls. (Note that Operator Connect and Calling Plan users don’t need to define emergency routes nor indicate that 911 and 933 are emergency numbers in North America for example… See my next post for way more details on this and Shared Calling in particular!)
A topic that generates a bit of conversation when I’m working with customers who are new to Teams is the call handling/forwarding capabilities of Teams. In particular, the forwarding settings are available to users, and they’re also available within Teams Admin Center. Thankfully, they’re identical, though there are a few combinations of policies and settings that can make things appear and disappear, creating some confusion.
Teams users can access call forward settings under the dialpad where they’ll see an icon like this:
It may look slightly different for them, it changes depending on the current setting. They can click on this for some quick changes, or there’s an option for More Settings. Alternatively, they can click the … up near their profile picture, then Settings and finally Calls. These two options bring them to the same spot. Administrators can find these settings under the “voice” tab for the user in TAC.
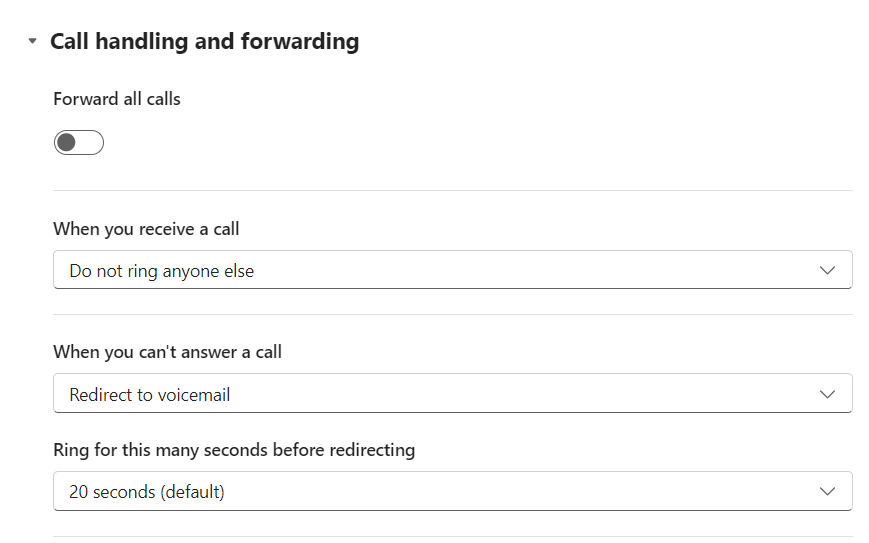
The default settings look like this:
which is pretty straight forward.
You can choose to forward all calls with the slider at the top. This is an immediate forward to another user, number, or your voicemail, with no extra options. It’s pretty boring so I won’t pollute your screen with yet another screenshot.
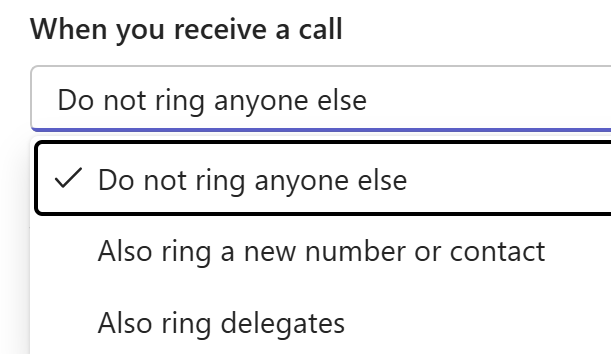
The next option down sets whether your calls will only ring you, or if your calls will also ring someone else or some other device:
This is great for busy people with assistants or teams who can answer calls on their behalf, or if you need to have one of your own numbers ring as well as Teams. Way back when the Teams client didn’t exist and the SfB/Lync mobile client was… less than stellar for calls, it was common to simultaneously ring your mobile phone number when Teams rang. Now with the excellent features of Teams mobile client, use of this feature is pretty rare.
Not to digress away from our conversation on forwarding, but I should mention here that Teams has a “Team ring” for others who can answer calls on your behalf, and delegation which is similar but ads the ability to place calls on your behalf. In both cases, Teams will provide an indication that the call you’re getting is in fact for someone else, or is being sent on behalf of someone else.
Keen admins might notice two settings in Calling policies in TAC:
This functionality is interesting. It allows you to handle inbound calls that arrive via the PSTN to your phone number differently than Teams-to-Teams calls from another organization. When both are set to “Use default”, you have the options we’ve just discussed.
The PSTN dropdown offers these settings:
Use default is what we’ve just discussed.
Unanswered settings is the second part of what we’ve just discussed:
without the 20 seconds of ringing – calls will go straight off to voicemail, or whatever other destination is configured here.
Send to voicemail is… well, it sends calls straight off to voicemail. This is a useful setting should the “When you can’t answer a call” be set to something other than voicemail.
And finally, “Let users decide” puts these three options out of the Teams Policy and in to the hands of the user in their Teams client.
The Federated calls dropdown offers these options:
These three are the same as the PSTN option, alas there’s no “let the user decide” option. Not including that option here is a curious decision.
Flipping the PSTN option to let the user decide offers up some additional settings in the Teams client (green):
There are some curious labelling and presentation choices here. First “external” is confusing because PSTN and federated calls are external… Here, external means PSTN and does not include federated calls – recall that there isn’t a “let the user decide” option for federated calls, just three fixed options.
Turning this slider in this green box off means that the settings at the top (purple) will apply to all calls.
Turning this slider on means that federated call destinations are indicated in the client settings (purple), but which of those destinations will be used is a function of the Calling Policy (default, top of the purple; unanswered, bottom of the purple, or voicemail).
Not mentioned in any of the above is internal calls. Internal calls from Teams users in your own organization are handled by the settings in purple, always. Additionally, if you have phones, call boxes, or a PBX integrated with Teams via Direct Routing, these will fall under PSTN – Teams cannot discern if those devices are “yours” or “from the PSTN”.
Phew, that’s a bit of a plate of spaghetti. I did some cut and paste and marking, and if you’re a visual learner perhaps this will help:
Remember, the “Use unanswered settings” (orange) only cares about the destination and not the “ring for 20 seconds” part.
It’s possible in Teams and in Entra ID/AD phone number fields to use whatever number format you wish and have things sorta kinda mostly work (at least internally). Your mileage will vary when you need to interact with the outside world, and things will just get messy if you are an international organization.
The source of this problem is assumptions. A user might assume that any 10 digit number is a North American phone number because that’s what North American phone numbers look like to North Americans. What about other countries with phone numbers that might also be 10 digits long? I might write (604) 464 2214 for a phone number in Vancouver, BC. A user in Malaysia might write 60 4-641 2214 for the Penang airport. Houston, we have a problem!
If a user clicks on these phone numbers in most Microsoft apps and most web browsers, their local dialing rules will usually be applied. That’s fine, sort of, if your users will never ever call another country, but will quickly lead to frustration if they have to.
It is imperative that international organizations use E.164 format in Entra ID and/or Active Directory. Everybody else should too, especially if there’s the tiniest chance that the organization will expand to a second country. Even a sales person or liaison in the UK from a US organization counts!
How does E.164 help? First, it requires that the country code be included at the start of the number. That would at least give us 1 604 641 2214 for the Vancouver number, with 60 4-641 2214 have 60, the country code for Malaysia. This doesn’t get us entirely in to the clear, as we still can’t tell whether the first digits are a country code or an area code within some unknown country. Prefixing the number with a + symbol indicates that the number does indeed start with the country code. That gives us +16046412214 and +604612214, guaranteed to be globally unique.
A common source of “assumed” formatting with numbers in AD/Entra ID is 3rd party systems like HR applications that push employee information into the directory. I’ve come across systems that are old enough and/or poorly written that just can’t do anything other than “well everything MUST be a US phone number!”. I’ve also come across organizations where HR inputs numbers in whatever format, because they aren’t thinking about click-to-call and what’s going to happen with the number after they type it in during the employee’s onboarding.
And finally, if you are find yourself mad at Teams because the user’s phone number doesn’t show in their contact card, and you have to go and enter these numbers in to AD/Entra ID, stop! Teams purposely doesn’t display the Teams phone number in contact cards because it’s not necessary. You can call another user in your organization by clicking on the phone icon in all of those drop downs. You don’t need to click on a number for a Teams-to-Teams call!
The addition of the Teams Phone Mobile along with pay-as-you-go calling plans and Operator Connect program for PSTN connectivity for Teams remains an area of uncertainty among organizations about which PSTN connectivity option is a best fit for their situation. Gartner clients often indicate that they are not clear about the Operator Connect offering, and how it differs from Direct Routing or Microsoft Calling Plans.
I think that’s a fair assessment, with Microsoft having recently rolled out a handful of new and expanded offerings there are plenty of options and they do have overlap and nuances. There are two main themes in this caution: how to connect “voice things” to Teams, and how calling plan licensing works. Let’s take those apart and see if we can clear up any confusion. I’ll also score things on categories of cost/billing, administration, technical complexity, coverage, and features.
Connecting Voice Things to Teams
There are five ways to connect “voice things” to Teams: Calling Plans, Operator Connect, Teams Phone Mobile, Direct Routing, and SIP gateway.
Operator Connect
Let’s start with Operator Connect, or OC for short. With OC, telcos partner with Microsoft to plumb their services directly in to Teams. You can review the list of telcos that can provide various services to various countries. There are a few global players, many regionals, and some national. You contract directly with these telcos for service, and they bill you directly. OC telcos set their own billing plans and rates.
Since OC telcos are plumbed directly in to Teams there’s no equipment to own or manage and thus no configuration time for that equipment. Your phone numbers are available to manage in TAC or via PowerShell, and each telco will offer a portal with varying levels of functionality. When you’re selecting a telco for OC, it’s worth asking about their portal features and getting a demo, especially around features like obtaining new numbers and configuring emergency addresses.
Calling Plans
Calling Plans, or CP for short, can be thought of as “OC by Microsoft”. Microsoft is your telco in this case, which means fewer relationships and bills to deal with. CP is also the fastest to set up, as you can acquire CP licenses in the same fashion as any other Microsoft license. You can be making and receiving calls within minutes. Number management is fully baked into Teams, and indeed it’s sometimes a challenge to understand what is a “Teams” thing and what is a “telco” thing – not that you have to, though. This easy-to-use management is excellent for “accidental administrators” in smaller organizations.
Microsoft has a number of different billing/licensing options for CP. Service is available in a number of countries, but OC from other telcos has the edge here.
Teams Phone Mobile
Teams Phone Mobile isn’t to be confused with the Teams app running on a mobile device. Teams Phone Mobile is a niche subset of OC provided by mobile carriers. Here, your mobile phone number is also your Teams number. For company owned devices this can save complexity and cost. For users who are always (or often) on the go and who are probably tempted to use their native mobile phone carrier for business anyway (*cough* sales guys *cough*) this simplifies things greatly for them, and prevents customer confusion since they no longer have two numbers.
This is a poor option for BYOD devices, that’s be left to “mobile carrier is personal, Teams app is work”. Availability is growing, however you may be limited to choice of mobile carriers.
Direct Routing
When it was being developed, Direct Routing (“DR”) was called “bring your own carrier” or “bring your own trunk”, which is still a great marketing tag line. With DR you connect a Session Border Controller (“SBC”) appliance to Teams, and then you connect anything you want to the SBC. This gives you monstrous amounts of flexibility that CP and OC can’t touch, at the cost of additional complexity and hardware. DR is how you integrate Teams with existing PBXs, other on-prem systems like paging, elevator phones and the like, basic SIP devices, as well as analog devices that you still have kicking around. You are responsible for providing your own carrier services to connect to the SBC, which means you can provide PSTN services to Teams anywhere in the world.
There are plenty of options for SBCs that work with Teams. They can be physical appliances, VMs, or cloud native services. They can be on-prem, in your data center, in a VM in Azure, Azure appliances, or owned/administrated/hosted by your carrier as part of your service – “SBC as a Service”. SBCs can come in high-availability pairs or clusters, and you can (should!) configure primary and backup units.
Owning and operating your own SBCs is not straight forward. There are different enough that any Microsoft or network technical staff will have a tough time properly configuring them. Partners are your friend here. You can also take advantage of SBCaaS with your telco, though you’ll lose much of the advanced functionality that makes the DR solution so attractive in the first place.
Direct Routing is also a requirement to take advantage of the Survivable Branch Appliance (“SBA”). The SBA can provide basic survivable telephony to a location should there be a network connectivity or Teams outage.
SIP Gateway
When an organization selects CP or OC for PSTN services, they’re left with a missing piece of the puzzle if they have analog or SIP devices that need to be connected. This could be paging systems or blue-light emergency phones, or the organization may have a number of existing analog or SIP phones that they don’t yet want to abandon. The only solution used to be deployment of an SBC, and then Microsoft introduced the SIP Gateway. The SIP Gateway lets you connect these SIP and analog (through an ATA or gateway, an “analog to SIP adaptor”) to Teams. This is only for voice endpoints, so you can’t add analog lines from a telco or do faxing.
SIP Gateway is an excellent choice for things like paging or those blue light phones. Some organizations that have a number of existing SIP phones that they don’t want to replace for financial reasons should carefully consider the total cost of doing so. Re-using existing SIP devices (which can include certain Cisco models as well as a number of other generic SIP phones) has a high administration cost as these devices cannot be managed through Teams the same as a Teams native phone. Each phone will need to be visited for a firmware change and registration to the SIP gateway. There’s a labor cost there, possibly a firmware/license cost for each device, and overall lower functionality for call functions, including dynamic e911.
Mix and Match
You’ve probably picked up from some of the above points that it’s possible to run a mix of all of the above options. This provides you with excellent flexibility and ability. Some common mix and match scenarios might be Direct Routing in the US with a handful of staff in the UK on calling plans. Or you may have Operator Connect everywhere but India, and select Direct Routing there to ease compliance with telecom regulations. Direct Routing is a requirement to take advantage of the SBA, however other locations – and even other users at the SBA location who don’t need the survivability – can be on other solutions.
I’ve also seen an organization deploy Direct Routing while they do a long-term migration from their existing PBXs while keeping full interoperability in place between the two systems. Once the migration is complete and the PBXs retired, they can strategically move some or all users to CP or OC services.
Voice Thing Licensing
When you’re licensing Teams for voice, there are two considerations. The first is that you need “Teams Phone System” for your users (or the equivalent license for shared phones). This is included in E5 licensing, otherwise “Teams Phone System” is available as an extra license to light up E3/E1 and F-license users. Devices that aren’t associated with a user get a “shared device license” – use this for common area phones, or paging gateways connected via SIP Gateway.
The second part is the PSTN access or “dial tone”. With OC, DR, and Teams Phone Mobile you obtain these services from your telco. For Calling Plans, you obtain those licenses from Microsoft. There are a couple of options:
Domestic Calling Plan,
Domestic and International Calling Plan,
Pay-as-you-go Calling Plan,
Communication Credits.
Domestic call plan gets a number of minutes per user per month. The quantity of minutes can vary per country, and some countries have a couple of different options. Typically this is something like 3000 minutes. These minutes are pooled between all users with the identical plan, in the same country.
Domestic and International Calling Plan combines your domestic minutes with international minutes, typically something like 600. Pooling rules apply here, too.
Pay-as-you-go is a base license per user per month with no minutes associated, and any minutes are billed against Communication Credits (see the next item below) or you’re on the New Commerce Experience in your M365 tenant, this is billed after the fact. This is a great option for users who rarely call, and when your overall minute pool is large enough you wouldn’t be able to make use of any minutes if you were to assign a domestic calling plan.
Communication Credits are a pre-paid credit. You can allow your users to use these credits to dial internationally when they only have a domestic calling plan, to place calls when minute pools have expired, or to place calls as a pay-as-you-go user. Communication Credits are typically tied to a credit card and automatically reload to your specified amount when they expire. Communication credits are also used for things like inbound calls to your toll-free numbers, and to dial out from Teams meetings if you’ve permitted your users to do that.
Your best course of action to decide which license to use is to pull date from your existing system. If you can’t do that, there is excellent reporting available in Teams where you can track usage. If you’ve got a pile of minutes left at the end of each month you may be able to bump some (or all) users down to pay-as-you-go. If you’re running out of minutes and burning into communication credits, you may decide to bump heavy minute users up to domestic or domestic and international calling plans. If you’re doing a phased rollout of Teams, keep an eye on this report to establish what adjustments you should make to your license purchases for future users.
The Scorecard
I promised a scorecard for comparison of the various options, so here it is, emoji style:
Calling Plans
Operator Connect
Teams Phone Mobile
Direct Routing
Cost
😑
😑
😑
😑
Billing – combined with Microsoft or additional to a different organization
😊
😒
😒
😒
Administration effort
😊
😑
😑
😒
Technical complexity
😊
😊
😊
😒
Coverage (countries with service)
😑
😊
😑
😊
Features/Capabilities
😑
😑
😑
😊
Scorecard notes:
Cost comparisons between the various solutions is far too complex to give a “this one!” answer. License/user/number count, provider contract terms, and your negotiation skills will all factor into this. Make sure you consider the cost of things like SBC upkeep if you’re comparing something against Direct Routing.
Billing – this is a yes/no, with Calling Plans winning because it’s just an additional Microsoft license on your existing bill.
Administration effort – Calling Plans wins here because everything is so tightly integrated. OC is a close second place, but may not be so close if your operator decides to make things complicated for you in their portal or for things like obtaining new numbers.
Technical complexity – DR is the loser here with SBCs and their upkeep, and a more complex Teams configuration. This all goes away with CP and OC
Coverage is an ever-changing factor. CP have the least global coverage. OC leverages many telcos existing networks, where Direct Routing lets you hook anything up, anywhere.
Features/capabilities – This isn’t calling features like call forward or transfer. Rather it’s things like your ability to control who can call internationally, or to further restrict who can call *where* internationally.
Still have questions? Give me a shout in the comments!