Analog Devices in Skype for Business

Analog devices are one of the least understood aspects of a Skype for Business deployment. In this post, I’ll provide a 30,000 foot overview of how analogs work with SfB on-prem deployments.

An analog device is anything like a phone, fax, alarm system, door buzzer or overhead paging system that uses an analog phone line. That phone line is a pair of wires that form a circuit that connects the device to your PBX or the telco.

With SfB, there is no Sfb hardware device that the analog phone can plug into. You have to use a gateway for this, from Microsoft partners such as AudioCodes and Sonus. However, plugging an analog device into a gateway doesn’t magically make it an SfB device. It doesn’t have presence, it doesn’t logon. It’s still just a boring analog device. The gateway communicates with SfB over a SIP trunk, just as if it were a SIP trunk from your Telco.

Gateways PBX and PSTN

What we’ve got then, is an analog device that has an analog circuit to a gateway, that gateway has a SIP Trunk to SfB. SfB will have a connection to the PSTN, which will use an SBC or another gateway.

It is possible to have analog ports on the same gateway that’s connecting your SfB environment to the PSTN, but for clarity I’m showing them as two separate devices.

When you place a call from the analog phone, the analog gateway uses its routing tables to determine where the call should be routed next. This might be a simple “send everything to SfB”, or it could be more complex and allow connections direction to the PSTN gateway, or to SfB.

When a call comes in from the PSTN, the PSTN gateway has similar options. It can send all calls to SfB, or it can route the calls to different locations. When calling from SfB to the analog devices, SfB sends the call directly to the gateway.

Routing

In all cases, you have to configure the gateways’ routing tables. Every gateway you add to your environment adds to the administrative overhead of your solution, and the complexity of your call routing options.

Call flows and routing decisions are a significant part of dealing with analog devices. In the next posts, I’ll cover how gateways can make routing decisions, and how SfB can be configured to simplify routing to analog devices with some loss of more advanced capabilities.

Emergency Calling Oopsies

I know more than a few people in emergency services, and they’ve shared some of their stories around bad location information situations. I wanted to share a few of those here so that you get an idea of what can occur. All of these scenarios are preventable – make sure you’re not contributing to future examples!

The Case of the Amphibious Cruise Ship

The first incident involves a sick passenger on a cruise ship coming in to dock. An ambulance was dispatched, but something seemed wrong to the paramedics – the address didn’t make any sense. The address was near an amusement park well inland, and nowhere near the cruise ship terminal. It turns out that the PBX was hosted in a datacenter near the amusement park, and the correct address for the phone number at the cruise ship terminal was never provided to the telco providing the PRIs.

The Case of the Mixed-up Addresses

The second incident involves a dispatching error. In a previous post on 911 and mobile phones I shared an example of what is typically seen at the PSAP. Here’s a variant on that example with what the dispatcher saw:

PSAP terminal no markup

In this incident, the dispatcher sent resources to the address of the cell tower (28 Mineral Rd in this example) as the location of the mobile phone had not yet populated in the ALI database.

The Case of the Relocated Consumer

The third example involves a consumer with a home VoIP service. The consumer moved from a major city to a remote area, and neglected to update their address information with the carrier. When they placed a 911 call, they were connected to emergency services at their old address. Without a built-in method for reassigning the call to the correct PSAP, the staff relied on their wits and contacted a friend in the police service who’s brother – also a police officer – was near the caller and was able to coordinate a response.

The Cases of the Swapped Suffixes and Dizzying Directionals

The fourth and final scenario isn’t a specific case, because it’s too common. When you provide addresses, be very careful for suffixes like “street”, “avenue”, “circle”, etc., as in many areas the same road name will exist but with different suffixes. Mixing up or omitting directionals like “north” or “west” is also too common. Be really careful if you have craziness like “Maple Court East West” or “North Main Street Southwest”. Dispatching emergency services to the wrong location can have terrible consequences.

Your Goal

When you’re deploying SfB – or any phone system or line for that matter – take an extra moment to ensure the address is correct and clear. In the US, you can use the USPS address format to make sure your suffixes and directionals are clearly expressed.

Main Number Handling: Response Groups, pt 5 – Timers

In my previous posts on Response Groups in my Main Number Handling series, I only lightly touched the area of timers on Groups and Queues as I feel they are better discussed together. As a refresher, the Group has an “Alert Time” value that has a default of 20 seconds, but can be set anywhere between 10 to 180 seconds:

AlertTime

Queues have a “Time-out Period” that also has a default of 20 seconds, and can be set from 10 to 65535 seconds – (about 18 hours!):

QueueTimeout

Note that the Queue time-out isn’t active unless you enable it. Not enabling a time-out causes the Queue to send the call to Groups forever – which probably means until the caller gets annoyed and hangs up. Be nice to your callers, and configure a timeout.

When a call is processed by a Workflow and send to a Queue, the Queue first determines if there is an overflow scenario – too many calls in the queue – based on the overflow settings. If not, the call will be sent to the first group listed in the “Groups” ordered list of the Queue.

Within the Group that has been selected to handle the call, a set of Agents will be identified based on the Routing Method you configured and the presence status of the Agents in the Group. The call will be offered to those Agents until

  • Someone answers the call
  • The Alert time expires

If no agent answers the call, the call is sent back to the Queue level for handling

  • If the Queue time-out is not enabled, or is enabled but has not yet expired:
    • The call will be sent to the next group in the Groups section of the Queue.
    • If the Queue has sent the call to all of the Groups in the list, it begins again at the top.
    • If there is only one Group, the call is sent to that Group again. They may notice a slightly longer delay in between rings, but otherwise their phones will ring continuously.
  • If the Queue time-out is enabled and has expired, the Call Action for the time-out takes place.

Let’s look at a couple of timer examples, assuming in all cases that nobody answers the call.


If the Queue time-out and Group Alert time are both set to 20 seconds, the Agents selected by the Group will ring for 20 seconds, then the Queue timeout action will apply.

If the Queue time-out is set to 20 seconds, and the Group Alert time is set to 30 seconds, the Agents selected by the Group will ring for 30 seconds, then the Queue timeout action will apply. The Queue time-out doesn’t overrule or short circuit the Group Alert time, the Group is allowed to ring for the duration of the Alert time:

Group greater than Queue

If the Queue time-out is set to 30 seconds, and the Group Alert time for the only group is set to 12 seconds, the Agents selected by the Group will ring for 12 seconds, then be sent back to the Queue. Since the Queue timer hasn’t expired, it will be sent back to the Group for another 12 seconds. The call will return to the Queue, and since there are 6 seconds remaining, the call will be sent back to the Group where it will ring the Agents for another 12 seconds. The Agents ring for a total of 36 seconds.

Group 3x for Queue

If the Queue has a Group list with multiple groups, each Group can have its own Alert time. Let’s say we have a Queue with a time-out of 45 seconds. The top Group in the list has an Alert time of 10 seconds, the second Group has an alert time of 30 seconds, and the third group has an alert time of 20 seconds. The call will be offered to the first Group, return to the Queue after 10 seconds and then be sent to the second Group. It’ll ring there for 30 seconds, then return to the Queue. 40 seconds have passed, meaning 5 seconds remain in the Queue time-out. The call is sent to the third Group where it rings for 20 seconds, then returns to the Queue. 60 seconds have passed, which exceeds the Queue timeout value of 45 seconds, and the timeout call action is taken.

Group different timers

Plan your timeouts carefully, otherwise you may wind up with too much time elapsing before a call is handled by the time-out call actions, especially if you use a number of different groups with different Alert times.

Something I didn’t mention in the above example are the queue overflow settings:

QueueOverflow

If these are enabled, the number of calls in the Queue is compared against the maximum. If the Queue is in an overflow state AND the action is toe Forward the oldest Call, the call will not be send to a Group for handling, and the overflow call actions will take place.

Exception

I’m hopeful that this overview of Queue and Group timers and how they relate to each other helps you understand how to configure your own timer values. My whiteboard has a dotted grid pattern on it, and if I’m planning a complex Queue/Group scenario, I’ll often plot out the combinations of timer values to ensure that what I’m building meets the requirements I’ve gathered. You could use graph paper, Excel bar charts, or even plain paper or whiteboard surfaces with a ruler. Testing all of your timer scenarios can be maddening at best, especially if you are allowing calls to queue for minutes (or hours). A little bit of time drawing out your timers can help ensure that you only have to test once.

Main Number Handling – Response Groups Pt 3 – Workflow Basics

We’ve covered Response Group Queues and Groups in previous posts, and we’re on the final component: The Response Group Workflow. Workflows aren’t as magical as Queues, but they are chock full of configuration options. Let’s jump in a have a look.

The first thing you’ll notice about RG Workflows is that they’re not edited in the Skype for Business Control Panel. Instead, when you click the “Create or edit a workflow” link

CSCP

You’re first asked to Select a Service, which selects the pool to build the RG Workflow on. You need to build your Workflow, Queue, and Group on the same pool. In my case, my lab only has one pool so I select it and hit Okay.

SelectService

And that opens a web browser and prompts for credentials. Enter your Skype for Business credentials that you used to logon on to the Control Panel, and you’ll be at the home page of the Response Group Configuration Tool

RGCT Homepage

You’ll see here that there are two options: Hunt Group and Interactive. The difference between the two is simple: Interactive allows you build one of those annoying call trees where you hit buttons to try and describe why you’re calling, and wind up in the wrong department anyway. Okay, I’m kidding – Interactive allows you to ask your caller a few questions in order to direct them to the appropriate Queue.

A great place to start is with the simpler Hunt Group configuration. Clicking Create (or, once you have a Workflow, clicking Edit) brings you to a configuration page with 7 Steps: Activate and Name the Workflow, Select a Language, Configure a Welcome Message, Specify Your Business Hours, Specify Your Holidays, Configure a Queue, and Configure Music on Hold.

In the remainder of this post, we’ll cover the essentials that you need to get a Workflow (and your Response Group) up and running. In the next post, I’ll swing back and cover these seven steps more fully.

Your first task is to provide a SIP address for the Workflow. Pick a name that’s descriptive and user friendly. Your users will likely see this name. You’ll also need to enter a Display Name, and your users will definitely see this name.

Step1TopOnly

Surprise! You don’t need to configure a Telephone number. You don’t actually need to configure a phone number for anything in Skype for Business unless you want to communicate with the PSTN. With a phone number, you can still reach the Workflow from a Skype for Business client, including from a federated organization.

The very last requirement is to scroll down to step 6 and select the Queue that you want calls handled by.

Step6

Click Save, and now you have a functioning, though basic, Response Group!

Main Number Handling: Response Groups, pt 1 – Intro and Groups

This post is part of my series on Main Number handling. The most feature-rich call handling solution native to SfB is Response Groups. Response Groups, while nowhere near a full contact center, offer a great deal of flexibility and capability for an organization.

In the overview post, I provided a brief outline of Response Groups – they are an on-prem solution that offers hunt groups or IVR trees to assign calls to a Queue, and you can designate agents to handle the calls within that Queue. Response Groups are comprised of a Workflow, that receives and processes the call, passing it off to a Queue. Queues have Agents that are offered the call. To “Offer a call” is Microsoft’s terminology for the Response Group service ringing a particular Agent’s phone, so that they have the option to answer the call.

You might think at first that the Workflow would be the best place to begin any kind of deeper explanation. I’ve found that the opposite is true, so let’s being by taking a look at Groups, and since a picture is work a thousand words, here’s a screenshot of where to find the Response Group configuration page in the SfB Control Panel:

groupincscp

You can see the three components: Groups, Queues, and Workflows. The components are homed on a Front-End Pool, so you will need to select a pool each time you create or edit one of these objects.

Diving into Groups and selecting New, we see this page (it’s the same page for editing):

newgroupcloseup2

Note that while these components are homed on a particular pool, users who are Agents in a Group can belong to any on-prem pool in your organization.

The Name and Description fields are self-explanatory. Note the red star indicating that the name is a required field. You can edit the name after creation, but make things easy on yourself and come up with a naming scheme before you start.

Note that you’ll need names for Groups, Queues, and Workflows. If you call all three components “sales”, life can get confusing for you, especially if you find yourself in PowerShell. The easiest way to alleviate this is to add _Group or _Queue to the end of the name for these components. Users never see these names, so don’t worry about confusing them.

Great naming standards are always a win in my books, but do feel free to leave notes in the description field that provide more insight into the purpose of the group.

Participation Policy has two options, Formal and Informal:

  • Formal requires your agents to sign in and out of the Response Group. You do this via a web page and not just a button on a phone or in the client. I personally find this annoying. The lack of other Contact Center functionality in Response Groups makes Participation Policies somewhere i
  • Informal means there’s no login/logout required. You are essentially always logged in. This is the most common selection that I see.

Alert Time  is generally how long SfB will offer a call to the Agents before it’s passed back to the Queue. There are two timers in Response Groups, one at the Group level and one at the Queue level. Any decent conversation about these timers needs to include how the two timers work together for you (or against you, if you’re not careful) so more on timers in the upcoming post on Queues.

Routing Method is the pattern that the Response Group service user to select Agents to offer calls to. Your options are:

  • Longest Idle: The Agent who has been idle the longest, as long as their presence is Available or Inactive.
  • Parallel: The call is offered to all Agents whose presence is Available or Inactive.
  • Round Robin: The call is presented to each Agent based on the list of Agents, so long as they are Available or Inactive. The RG service keeps track of the last agent that was offered a call, and will start with the next agent for the next call. Over time, you will get a roughly equal distribution of calls, assuming your agents have similar presences statuses for similar amounts of time.
  • Serial: Similar to Round Robin, but follows the order of the agents as you have them in the Agent list, so long as that user is Available or Inactive. Unlike the Round Robin option, the RG service will start again at the top of the Agent list for the next call. This is a great way to prioritize your agents so that one person typically answers calls, but calls will immediately go to their backup(s) if they’re not available
  • Attendant: The RG service will offer the call to all agents, regardless of their presence (Save for DND and Offline). One key difference is that the calls will “stack up” in the Agent’s notification window, and they can cherry pick which call they answer. On the downside, agents will hear ringing and see toast for each call that is coming in. If you have a lot of calls stacking up, this gets really annoying. (Use Queue overflow settings to alleviate this)

Agents are last. We have a dropdown that allows you to build your own ordered list of agents, or select an existing AD distribution list. The distribution list can be a great option however there are a couple of gotchas:

  • The Response Group service is updated overnight through SfB maintenance processes. If you need to add an agent to a group faster, you can either fiddle with triggering updates manually or use the “customer group of agents” option instead.
  • The Response Group service can’t take advantage of nested groups. Only direct members of the group you select become agents.
  • Agents must be enabled for Enterprise Voice.

Gotchas to watch for when adding a user as an Agent to a Group in a different SfB Topology Site

  • An user in the same site as the pool hosting the Response Group will receive a banner on their client advising that they’ve been added to the Response Group as an Agent. A user outside of that site will not receive any notification that they’ve been added to a Group.
  • An Agent in one site cannot place calls on behalf of a response group in a different site.
  • When an agent hits their default logon/logout page via the client, it will only have Response Groups from their own site. They’ll need to manually bookmark the login/logout page for any other sites that host Response Groups that they are a member of.
  • You can leave a group without any agents defined, but you cannot use that group for anything. (Stay with me here, this applies in a more advanced call handling scenarios that I’ll get to later).

And that’s it for Groups. Next up will be a post on Queues, where all of the interesting stuff happens.


FXO vs FXS in Skype for Business

Analog trunks and devices are less and less of a factor in many of the projects that I work on. Areas where I still see analog are branch office trunks, faxes, door buzzers/enterphones, paging systems, and ring-down phones that you might see in a parking lot to contact security or a cab company.

To integrate analog trunks or devices with SfB, you connect them to a gateway. The gateway can come with two types of ports: FXO, and FXS. FXO is an abbreviation for Foreign eXchange Office, and FXS for Foreign eXchange Subscriber.

So, clear as mud and we’re done here, right? If you’re an old school telecom guy, you know there’s a lot of complexity hidden behind that simple jack in the wall. The good news is for nearly all SfB use cases we can boil things down so they’re very simple.

FXO is a port that you plug a telco trunk line into. FXS is a port that you plug your phone or other device into. Mostly. Confusion pops into the picture when you have paging systems or enterphones, which may oddly use the opposite interface than you’re expecting, or give you the option for both.

You can think of FXO and FXS as North and South on a magnet, or male and female, or whatever pairing you’d like. A FXO device plugs into an FXS device, and all is well, like this:

Your phone, which has an FXO jack on it, plugs into the wall, which is an FXS interface.

Your phone, which has an FXO jack on it, plugs into the AudioCodes MP-118 gateway FXS port.

The AudioCodes MP-114 gateway FXO jack plugs into the wall, which is an FXS interface.


MP114 back

An AudioCodes MP-114 gateway. From the left are power, Ethernet, RS-232 serial console, two FXS ports and two FXO ports.

Great, so why then would a paging system offer both FXO and FXS interfaces? The answer is that there are two different use cases for the paging system.

One use case is a standalone, where a phone plugs directly into the paging system. You pick up the phone, maybe enter some digits to indicate what zone to page, and you talk away. The paging system is acting as a PBX in this scenario.

The second use case is PBX integrated, where the paging system acts as a phone. You dial the extension for the paging system, it rings and then answers, you maybe enter some digits to indicate what zone to page, and you talk away.

These two use cases also apply to things like enterphones or gate/door buzzers. You can have a phone plugged directly into the enterphone, or you have have the enterphone act as an extension on your PBX.

The standalone option is simple, but restricts you to interacting via a single phone. The PBX integrated option is more complex, but allows you to interact via any phone on the PBX.

Caution: “interact via any phone on the PBX” in the SfB world means that in a global deployment, you could have a prankster user in New York telling jokes over a paging system in Paris. Configure your dial plans appropriately if your paging system doesn’t offer PIN functionality!

If you have a choice between using an FXO port or FXS port on a gateway to integrate with an analog device that offers both, I recommend you pick the FXO port. This has the device act as a PBX, which means that there is no ringing when you call it, and call setup is faster. Disconnects are usually quicker too, which is important if the paging system or enterphone is used a lot.

When you configure the device to plug into an FXO port on the gateway, set the gateway to route calls to that number out via the FXO port you’ve connected it to. If the device will be sending calls to the gateway, set the gateway to

You’ll need to use an FXS port on your device to connect to the gateway’s FXO port. If your device has one port that’s switchable between FXO and FXS, read the manual carefully – I’ve seen some that aren’t clear whether they mean FXO mode is “setting this device to FXO” or “setting this device to talk to FXO”. If it’s really unclear, plug a boring analog phone in. If the line is dead, the device is set to act as an FXS device and the port is configured as an FXO interface.

Do you need a voice VLAN?

I’ve had three conversations in the past week or so around whether a voice VLAN is required or recommended for use with Skype for Business. Let’s take a quick look at where the concept of voice VLANs came from, what they can do for you, and whether you need them for your SfB deployment.

The idea of a voice VLAN first came about when the only IP endpoint for you IP PBX was a phone on their desk. The phones generally needed a specific DHCP configuration, and if the phones were in their own VLAN this was easier to do. QoS was implemented as 802.1p at the layer 2 (switch) level, and it was much easier to simply say “this voice VLAN gets a priority of 5”. Some switches would use Cisco Discovery Protocol (CDP) or Link-Layer Discovery Protocol (LLDP) to automatically put a device that said it was a phone into the voice VLAN. Much of this early IP telephony was done with voice guys coming from a traditional TDM PBX environment. The world of IP was new to them, so anything that made their lives easier and more automatic was welcomed by not only the voice guys, but also by any IT guys who had to work with them.

Raise your hand if you ever had to explain IP subnetting to your voice guys new to IP, and try to sort out for them why the IP telephone system vendor was blabbering on about Class A subnet masks and VLAN 0. Thankfully for me, my voice guys were smarter than your average bear and quickly picked up some good habits vs the drivel in the phone vendor manuals. (Thanks Brian and Willy!)

The curious thing is that at no point did anything actually require a voice VLAN. They just made life a lot easier and more “automagic”. You could deploy a perfectly good VoIP solution without using voice VLANs.

Fast forward to today, when we talk about Unified Communications instead of IP telephony. We now have soft clients, room systems, and mobile clients. In additional to voice, we have modalities like video, web conferencing and screen sharing, all from the same client. We’ve also got BYOD and Cloud technologies to add excitement to the mix.

Having your desk phones into a voice VLAN doesn’t provide any benefit to you when you’re conferencing from a PC, or watching a PowerPoint on your iPhone in the lunchroom while you wait for the coffee to finish brewing. A good number of your users might not even have a desk phone, opting instead for a headset and soft client.

One scenario where a voice VLAN does make some sense, is when you’re doing a large-scale deployment and the number of phones you are adding outstrips the number of available IP addresses on your existing subnets. In this case, it may make sense to create a new VLAN for the phones. I say “may” as you might also have a requirement to use IP subnets for location determination for emergency calling. Overlaying a single voice VLAN to cover your site may not be suitable – you may have to deploy multiple voice VLANs to provide the location granularity required. It may make more sense to simply further partition your network into general purpose user VLANs.

Do I recommend voice VLANs? No. I think they’re a thing of the past. They add complexity to your network, increase your administration, and affect only a very small number of your UC endpoints. For those endpoints that they do affect, they do not offer any benefits that can be provided via other means, and often those other means will need to be in place for other endpoint types and other modalities.

Bad Checksum in Packet Captures

I was working with a carrier to identity some SIP trunk issues recently, and they requested a packet capture of the traffic leaving our Mediation servers. I sent the capture over, and they quickly came back with a question: Why are all of the packets marked as “Bad Checksum” in NetMon.

NetMon

As it turns out, this isn’t anywhere near the disaster that the carrier thought it was. If we open the same capture in Wireshark, we can see that Checksum validation is disabled.

Wireshark2

This is expected when you are running your packet capture on a host that is generating or receiving the traffic you’re interested in (versus setting up a span port on a switch and mirroring traffic to a dedication packet capture machine). The reason? The packet capture takes place within the network driver stack, while checksums are almost always offloaded to hardware. For outgoing traffic, the packet is captured before the checksum is calculated, and there is no valid checksum available to include in the packet capture.

Here’s handy diagram courtesy of http://wiki.networksecuritytoolkit.org that shows the network stack and where the Packet Capture and Checksum take place. (Red arrows and boxes)

First with Offloading:

Segmentation_offloading

Packet capture with Offloading

And now without Offloading:

No_segmentation_offloading

Packet capture without Offloading


If you’re not capturing packets to detect and correct malformed packets, this shouldn’t be of concern to you. If you need checksums, you have two options. One is to select your network adaptor, choose Properties, and on the Advanced tab, find all of the “Checksum Offload” properties and set them to Disabled (don’t do this). The other use a span port on a switch to mirror traffic to a dedicated capture PC (do this instead). Setting Checksum Offload to disable means you will take a performance hit, as you are no longer using the hardware on the NIC to perform these calculations. If you absolutely cannot do a span port, disable Checksum Offload with caution and be sure to re-enable it immediately after you’re done.


Happy packet capturing!

Certificates from 30,000 feet

When dealing with certificates, people tend to fall into three groups: The first are the security nerds that dream about cryptanalysis and PKI. The second is those people that understand what certificates they need to plug in where, but maybe don’t know the exact differences between things like MD5 and SHA1. The third group are those that follow the steps in the article they’re reading, hoping – sometimes praying – that things just work when they’re finished the last step.

In this post, I’m aiming to help those of you in the hoping/praying group understand a little bit more about what certificates are, why they’re that way, and maybe move you out of the hoping/praying group and into the understanding group. Certificates aren’t typically explained well to the average IT administrator. You either see an explanation of the math behind certificates, or you get vague references to things like the SANs that you’ll need on your certificate, if only you were deploying the exact Lync environment that’s in the blog you’re reading. So, let’s talk about certificates – what they are, how they work, and what different types of certificates exist.

The Basics

Certificates serve two purposes: they identify a device, and they permit encryption.

If I were to draw a comparison between a certificate and any non-IT concept or object, I would compare certs to a driver’s license. They’re both issued by some authoritative source, and they are both used to validate your identity.

BCDL

(Who would name their daughter “Test Card”? I guess someone with a last name of “Sample” might)

Cert General

A driver’s license will have a photo, and maybe some biometric things like age height, weight, hair colour, eye colour, and a signature. It probably also has an address. It’s also got your name. There’s usually the name of the issuer, an expiry date, and there might be a hologram that you can use to determine if you trust the driver’s license. A certificate has these things, or at least the IT equivalent of them. A certificate has a name (the “Subject Name”, or SN), as well as nicknames, properly know as Subject Alternate Names, or SANs. There’s a field that contains the name of the issuer, location information, and a public key in place of all that biometric stuff.

Trust

The first concept that we need to explore is trust. If I’m trying to order a beer with my dinner, I might need to show ID to prove my age. If I show my driver’s license to the staff, they can easily recognize the license and establish my age. If I’m travelling in Europe, I might run into issues if I show my driver’s license, as the staff may not recognize it, and therefore they don’t trust it. However, it’s likely that I also have my passport with me, and the staff can easily recognize that, and trust it. At a restaurant near my home, the staff trust my driver’s license because it’s in a format that they’re expecting, and they recognize and trust the issuer.

This same concept of trust is how certificates work, too. You can configure a computer or application to trust a certificate, or you can configure the computer or application to trust the certificate issuer, called a Certificate Authority. In the Windows world, Windows has a default list of commonly trusted Certificate Authorities, and updates to this list can be done via Windows Update. You can also add and remove Certificate Authorities from this list manually or via Group Policy or scripting. This is especially important when you deploy your own Certificate Authority on your Domain.

Some applications, like the Firefox browser, choose not to use the Windows list of trusted Certificate Authorities and instead have their own list. Different devices – an iPhone, a Windows Phone, a CX600, or a Galaxy S5 – will all have different lists of which Certificate Authorities they trust.

Public and Private Keys

Now that we’ve got the concept of trust down, let’s get a bit deeper into how certificates work. In the physical world, we have keys and locks, and the key is used to open the lock. The key may or may not be required to secure the lock. In the IT world, we have public keys and private keys. Together, they’re called a key pair. The private key is NEVER given out, and is held on and used by the server identified on the certificate. The public key is ALWAYS given out, and is provided in one of the fields on the certificate.

Encryption

If I want to encrypt something to send to the server, I will use the servers public key to encrypt the information. The server will then use its private key to decrypt the information.

This kind of encryption, called asymmetric encryption, is a bit of a resource hog. There’s another type of encryption, Symmetric Encryption, that uses just one key to encrypt and decrypt, and it’s a much less intensive operation. Since the same key is used for encryption and decryption, you can’t stick in on a certificate that’s publicly available. Instead, the symmetric key is generated using your own private key and the other servers public key, and some math that I’m pretty sure involves dark magic. This keeps the asymmetric key is safe from prying eyes. Symmetric encryption isn’t as strong as asymmetric, so every so often, a new key is generated and replaces the old key.

You can see that a key pair is a little bit different that a physical lock and key. Where a physical key opens the matching lock, the public key and private key in a key pair work as a lock and key in one direction, and a key and lock in the opposite direction.

Signing

Something else that the server can do, is sign something to prove that it’s genuine, kind of like the hologram on the driver’s license. The server performs this signing function with its private key, and you would use the public key to validate the signature. (Our analogy to the physical world falls apart here, and there is no physical-world equivalent of signing with a lock and key).

So, enough about keys. If you’re interested in learning more, I encourage you to have a look at Wikipedia and Bruce Schneier has a great book on cryptography.

Root and Intermediate Certificate Authorities

Okay, so now we know that we have Certificate Authorities that issue certificates, like the motor vehicle office offers drivers licenses. Let’s say that one night, someone breaks into the motor vehicle office, and steals everything that they’d need to make their own drivers licenses. Ouch, that would be pretty bad, right? The driver’s license office might respond by changing the hologram, and if the cards had any kind of chip on them, they’d maybe generate a list of the chips that were on the cards that were stolen, so the stolen drivers licenses could be easily spotted.

Similarly, it would be really bad if someone hacked your Certificate Authority and stole the root certificate. The root certificate is what signs all of the certificates that are issue. The hackers are now able to generate fake certificates that looked valid. Now, all of these fake certificates would be signed by the certificate authority (we talked about signing with keys earlier). The certificate authority would publish something called a Certificate Revocation List, or CRL, that would have the serial number of the certificate that was on the certificate authority. The CRL is usually always accessible via http on a public website. This way anyone can check that validity of a certificate.

In this scenario, the certificate authority would also publish the serial numbers of all of the genuine certificates that were previously issues by the CA with the compromised root certificate. The certificate authority needs to issue a new root certificate, and everybody needs to get a new certificate issued – what a pain! But wait, it gets worse. Windows, your mobile phone, and all kinds of other devices have the root certificate from the Certificate Authority in the list of Certificate Authorities that they trust – and now that root certificate is compromised. There’s no easy way to add the new Certificate Authority root CA into the trust certificates list. You’ll need an update on your device (maybe Windows Update, maybe Apple issues a new iOS version), or you can do in manually. That’s definitely painful.

There is another way to do certificates that prevents this pain, and it’s by using Intermediate Certificates. If a Certificate Authority’s Root Certificate is Papa Bear and a certificate is Baby Bear, an Intermediate Certificate introduces a new generation of bear. The CA Root Certificate becomes Grandpa Bear, the Intermediate Certificate becomes Papa bear, and your certificate is Baby Bear. The Root CA (Papa Bear) can now generate a couple of Intermediate Certificates (Papa Bears). After the Root CA has generated the Intermediate Certificates, the Root Certificate Authority machine is turned off, disconnected from the network, and locked up. This is like Grandpa Bear living under witness protection, or maybe with body guards. The Intermediate Certificates are then what are used to issue your certificate. There are probably multiple intermediate certificates in use by your certificate authority. This is like multiple Papa Bears having lots of Baby Bears.

Now in our theft/hacking scenario, if the CA is hacked and the Intermediate Certificates are stolen, the CA goes through the same CRL process that we saw earlier, except the Root Certificate, powered off and secured, wasn’t compromised. All those devices still trust the Root CA. Replacement Intermediate Certificates are issued, and they in turn generate replacement certificates. Customers (you!) still need to reissue certificates, but you don’t need to worry about updating root CAs on all of your devices.

You can read all about securing a Microsoft Certificate Authority on TechNet. (The TechNet article is free of bear analogies.)

There’s one thing about Intermediate Certificates that I haven’t explained. The Certificate Authority gives you a copy of the Intermediate Certificate when you download your certificate from them. You put the certificate in the “Personal” certificate store, and you put the Intermediate in – you guessed it – the Intermediate Certificate store. Now when anyone needs to interact with your certificate, your server shows them your certificate AND it shows them the intermediate certificate. Think of showing your driver’s license, as well as a “certificate of authenticity” from the motor vehicle office that generated it.

Please, please, make sure that you only put a certificate into the spot where it should go. No Personal (issued to a server, user, or device) certificate in the Intermediate Certification Authorities store, no Root and Intermediate Certificates in the Personal store, etc.. Some applications can choke when they check your certificate store and find the wrong type of certificate in them. Choking isn’t good, as there’s no Heimlich maneuver  for servers. You need to be particularly alert when you’re installing a certificate that you’ve just downloaded from a CA. If you just double click the downloaded file, it may stuff your certificate, intermediate certificate, and root certificate all into the Personal Certificates store. If you do double click such a file, run the certificates MMC (the easy way is to run certlm.msc, otherwise open mmc, add the certificate snap-in, and select Local Computer). Open each store, and if you see something in the wrong place, drag it to the correct store. Delete any duplicates – but only after you ensure that the serial numbers match, otherwise the duplicate name with a unique serial number is valid, and may be in use).

You may want to do this clean-up routine on your server’s certificate stores if you’re not sure what state they are in.

Wildcard and Self-Signed Certificates

You probably still have some Lync specific questions like “What is a wildcard certificate, and why doesn’t Lync like them”.

We’ve already said that a certificate is your driver’s license with your picture, name, age, height, weight, and signature. This is great for validating your identity, but what about a situation where you also need to validate who you’re talking too? That’s often the case when you have two servers that need to communicate, like your Edge and your Front-End, or maybe your Mediation Server and your Exchange UM server. In a case like this, the servers need to show each other their certificates. When two servers use their certificates to validate their identity and encrypt traffic, it’s called Mutual Transport Layer Security, Mutual TLS, or just MTLS.

This is really different from plain TLS, which isn’t mutual at all. TLS secures traffic both ways, but only proves the identity of one of the parties in the conversation. You use TLS when you browse to a web server over HTTPS, like your bank. The server has a certificate, but your client doesn’t. Depending on the server and what you’re doing on it, you might have to validate your identity with a username and password, or you might have some form of two-factor authentication.

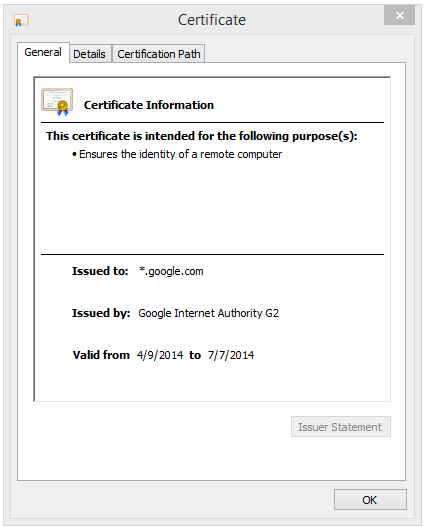
So, a wildcard cert looks like this:

Google Wildcard

If we were to compare a wildcard certificate to a form of “wildcard” driver’s license, it would have no first name, no height, weight, age or signature, and instead of your mugshot, it would have that really bad photo from your Sample family reunion last summer where your crazy uncle Dave looked like he was ready to pass out. And that would allow anyone who was at that reunion, who shares your last name, to drive. Yes, even your crazy uncle Dave. Seriously – who would think that this kind of driver’s license is a good idea?

Group DL

Wildcard seem like a pretty silly thing. Are they completely useless? Well, no. They do serve a valuable function, and that is to provide a low cost certificate that you can use on a variety of your devices to ensure traffic is encrypted. A Bank would NEVER use a wildcard cert. Google uses wildcard certs where they just need to ensure encryption, such as when you search. However, Google uses a full Subject Name on certificates for things like Gmail, where you need to validate the server’s identity.

Another type of certificate is a “self-signed” certificate. These show up in web interfaces on routers and switches, and they’re also used in Exchange when that’s installed. Putting a self-signed certificate on your server is like your server saying “hey, I’m your server! Here’s my certificate that I issued to myself! Trust me!!!”. This is a crazy, crazy concept. Here is the driver’s license equivalent of a self-signed certificate:

MeganDL

That’s right, your 6 year old cousin Megan (she was only three at the family reunion where the picture for your wildcard certificate was taken) drew up her own driver’s license! Hand her the keys to the Prius and stand back everyone! 6 year old Megan drive!

No, she can’t. She probably can’t even see out the windshield or reach the peddles. The concept of Megan drawing her own driver’s license making her able to drive and use it as a form of ID is silly, and only her mom, dad, and her stuffed unicorn would ever trust it as a form of identification.

Self-signed certs, by default, are only ever trusted by the server that issued the certificate to itself. If you want your computer to trust it, you have to add that certificate to the Personal store of your computer. You shouldn’t add the self-signed certificate to the Trusted Root Certificate Authorities store, because it’s not a Certificate Authority. And, just because you can trust a self-signed certificate, that doesn’t mean that you should. Self-signed certificates are great for your lab, but not much more. If you’re thinking of using a self-signed certificate in a production environment, you should consider why you need a certificate in the first place. If you have reason to need a certificate, set up Active Directory Certificate Services. If you don’t need a certificate, save yourself the trouble and just use HTTP or whatever protocol gets the job done without the certificate.